The word subtractive simply means taking away or removing something. Similarly, in music mixing, subtractive EQ refers to removing the problematic frequencies, which could otherwise interfere with the mix. In this blog, I will discuss what subtractive EQ is and how it can help bring clarity to your mix. In the end, a few actionable tips will also be provided to you. Through this, you will be able to understand the true capabilities of subtractive EQ.
Table of Contents
Why EQ Matters in Mixing in the first place?
Difference between Subtractive EQ and Additive EQ.
Common EQ Filter Shapes Used in Subtractive EQ
4 Actionable Tips on how to use it
What is Subtractive EQ?
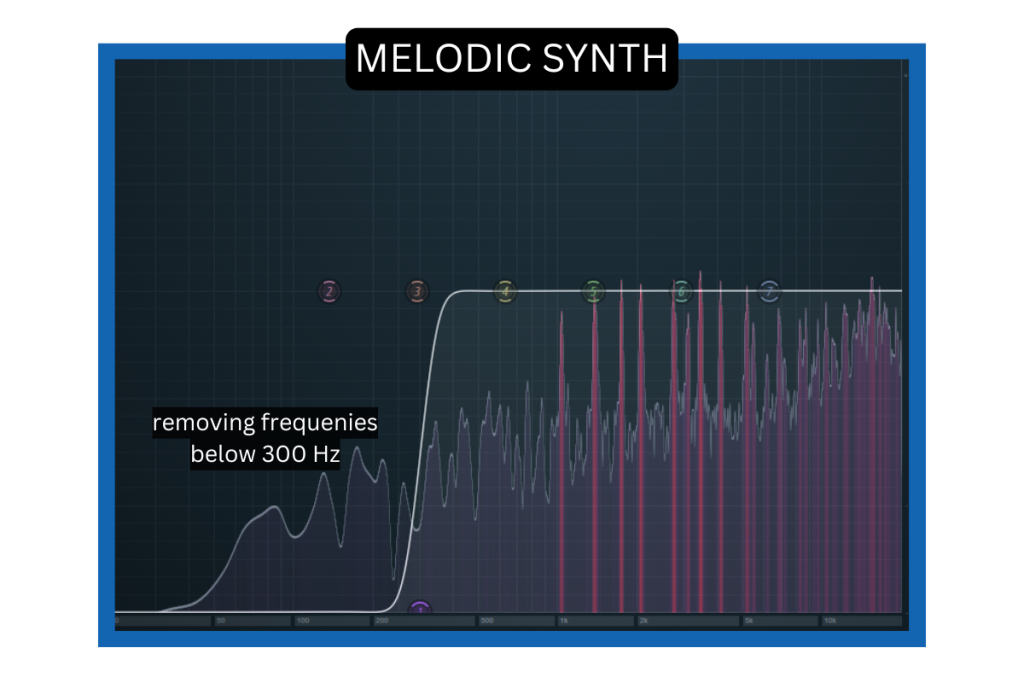
Subtractive EQ is a mixing technique where you identify and remove unwanted or harsh frequencies in a track. This helps keep your mix clean and prevents it from sounding muddy or cluttered. For example, low frequencies below 300 Hz often cause muddiness. One way to fix this is by using subtractive EQ to reduce the low end in non-bass elements like vocals, melodic synths, or percussion.
Before we dive deeper into subtractive EQ, let’s quickly understand why EQ (equalization) matters in the first place.
Why EQ Matters in Mixing in the first place?
Equalization, or EQ for short, is a key part of the mixing process. It helps shape the sound of each element so they all work together in a balanced way. Without proper EQ, a mix can feel messy or unclear, making it harder to reach a professional-sounding result. Here are a few reasons why EQ is so important in mixing:
Clean up audio and create space
EQ helps remove unwanted frequencies from different elements in a mix. For example, with a vocal recording, you can use EQ to cut out low-end rumble and control the midrange. This gives space for bass-heavy instruments to sit better in the mix without clashing with the vocals. In short, EQ helps each element find its place by reducing frequency overlap.
Tonal Shaping
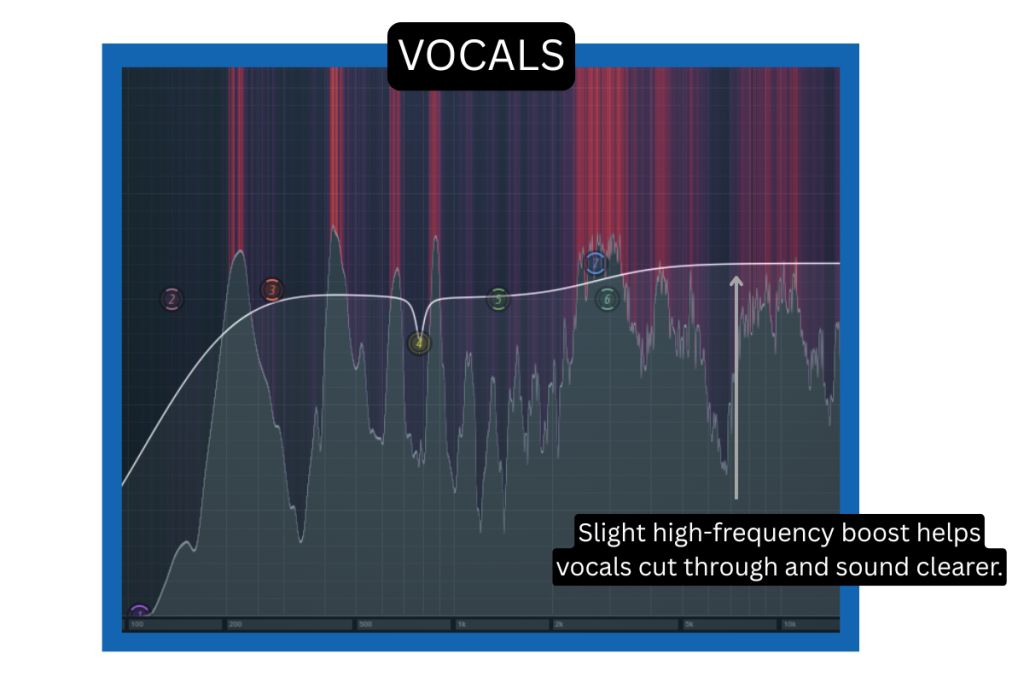
Tonal shaping is the process of adjusting the frequencies of a sound to achieve a specific character or feel. It often involves making subtle EQ changes to enhance or soften certain tones. For example, if you’ve recorded vocals that sound a bit dull or lack brightness, you can boost the high frequencies slightly using EQ. This adds clarity and helps the vocals cut through the mix.
Balances the overall mix
EQ also plays a big role in balancing the overall mix. By removing unnecessary or harsh frequencies, you help each element sound cleaner and more defined. This prevents the mix from becoming muddy and ensures that different sounds don’t clash in the same frequency range. In the end, EQ helps all elements sit together more naturally.
Difference between Subtractive EQ and Additive EQ.
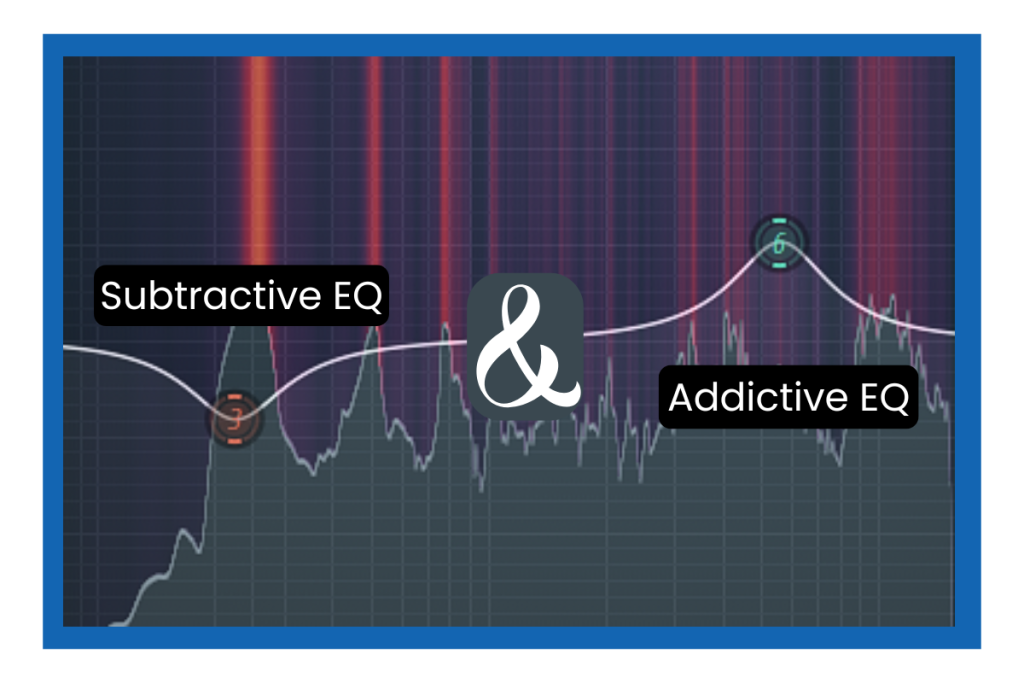
Subtractive EQ
It involves cutting frequencies. Be it the harsh frequencies or the muddy low end. This mainly focuses on removing rather than adding.
When to use it?
- To remove muddiness or harsh frequencies
- To make room for other instruments
- To clear out clashing frequencies
Additive EQ
Compared to subtractive EQ, additive EQ does the opposite. It focuses on boosting certain frequencies to shape the sound. For example, if you want your vocals to sound brighter, you can boost the high frequencies using additive EQ. It’s also useful for adding presence to lead instruments, helping them stand out in the mix.
When to use it:
- To brighten a dull vocal
- To add presence or sparkle
- To give a bass more thump or weight.
A good rule of thumb: “Cut first, then boost if needed.”
Common EQ Filter Shapes Used in Subtractive EQ
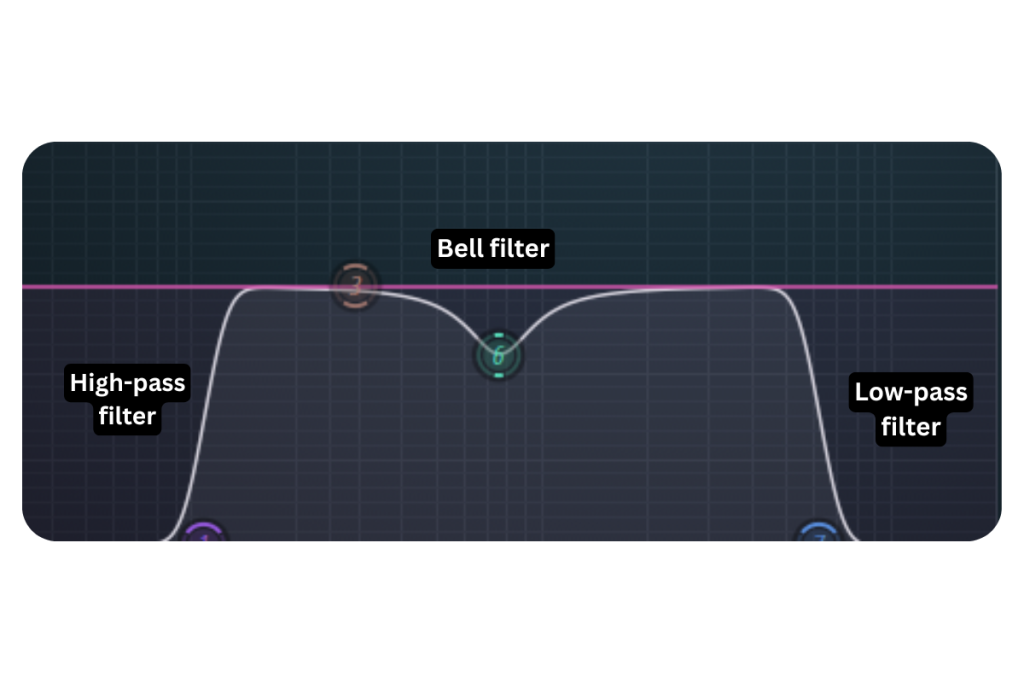
Here are some of the common shapes that you can use for subtractive EQ:
Bell filter
A bell filter looks like a small bump or dip on your EQ curve, shaped like a bell. It focuses on one specific part of the sound. In subtractive EQ, you use it to reduce problem frequencies, like harsh frequencies, muddy areas, or boxy sound. It’s great when you want to clean up audio, just one small spot, without changing the rest of the sound. For example, cutting around 300 Hz can make vocals sound clearer and less muffled.
High Pass Filter
A high-pass filter removes all the low frequencies below a certain point and lets the higher ones pass through. It shows up as a curve that slopes up from the bottom left of your EQ. In subtractive EQ, it’s perfect for eliminating deep rumble or unwanted bass that your sound doesn’t need. You’ll often use it on vocals, guitars, or hi-hats to clean up audio mix and leave room for the kick and bass.
Low Pass Filter
A low-pass filter is exactly the opposite of a high-pass filter. It removes the high frequencies above a set point and keeps the lower ones. It shows up as a curve that slopes down from the top right of your EQ. You can use it in subtractive EQ to get rid of hiss, harshness, or sharp edges in sounds like synths, background effects, or cymbals.
4 Actionable Tips on how to use it
Start with Subtractive EQ Before Boosting Anything
Always begin by removing the bad stuff before adding more. Subtractive EQ helps clean up audio muddiness, harsh frequencies, or overlapping sounds. Once everything sounds clearer, you can use additive EQ to enhance what’s left. If you boost too early, you might end up making problems worse or adding clutter to your mix.
Use a Narrow Q to Sweep and Find Problem Frequencies
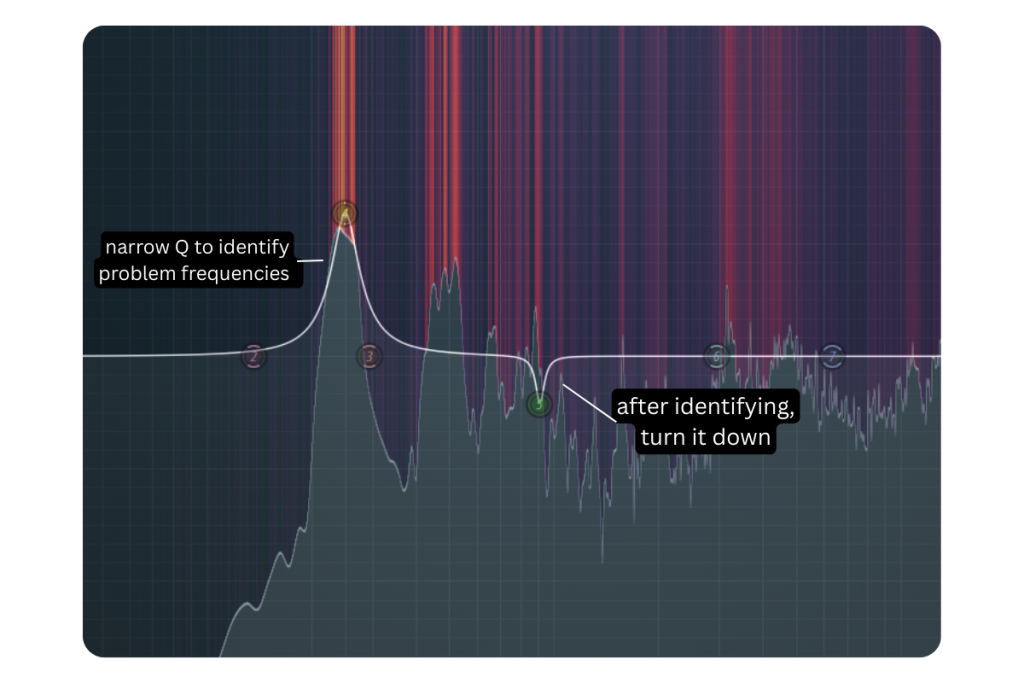
To find what’s wrong, use a narrow bell filter and gently boost it. Then, slowly move it across the frequency range while listening closely. When you hear something sharp, muddy, or just unpleasant, stop and cut that frequency slightly. This “sweep and cut” method is great for cleaning up vocals, instruments, or even full mixes. Make Small,
Gentle Cuts and Don’t Overdo It
Subtractive EQ should feel more like trimming, not chopping. Try cutting only 2–3 dB at a time. If you remove too much, the sound can become thin or lifeless. It’s better to do a few small cuts in different places than one huge cut. Keep it natural and only take away what really hurts the mix.
A/B Testing
As you make EQ changes, turn the plugin on and off to compare. This is called A/B testing. It helps you hear if your cuts are actually improving the sound. Sometimes we think a change helps, but it doesn’t. Testing helps you stay objective and avoid over-processing your track. Always trust your ears.
Conclusion
Subtractive EQ is a simple but powerful tool that can clean up audio, making it more balanced and more professional. By learning when and how to cut unwanted frequencies, you’ll be able to give every element its own space, without fighting for attention.
Remember: start with subtractive EQ, keep your changes subtle, and always listen critically. The more you practice, the more naturally this process will fit into your mixing workflow.