Getting a clear audio mix isn’t only about volume and EQ. The way sound is placed between the speakers makes a huge difference. This is where mid side processing comes in. It lets you process the Mid (center) and Side (width) separately for precise control. By doing so, you can shape the stereo width, keep important parts strong in mono audio, and create a wide mix that still feels balanced. For beginners, it’s one of the easiest ways to make music sound bigger, cleaner, and more professional without overcomplicating things.
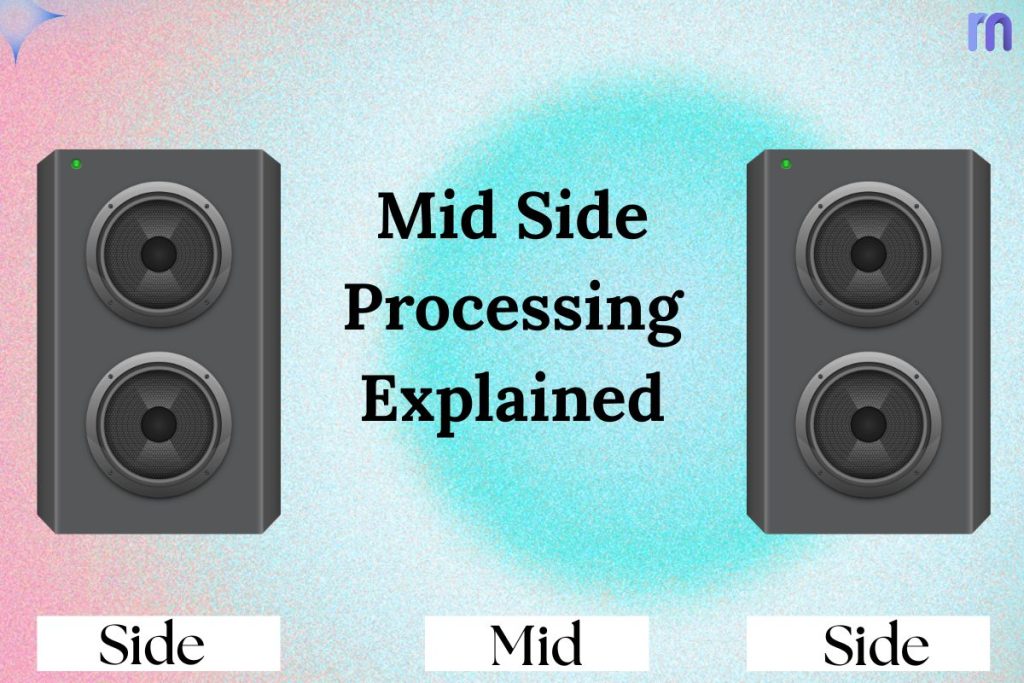
Table of Contents:
Core Benefits of Mid Side Processing
How to use mid/side processing in mixing
How to use mid/side processing in mastering
Frequently Asked Questions about Mid/Side Processing
Mid Side Processing explained
When people first hear the term Mid Side processing, it sounds technical, but the idea is actually simple once you break it down. Think of your mix as two different layers of sound:
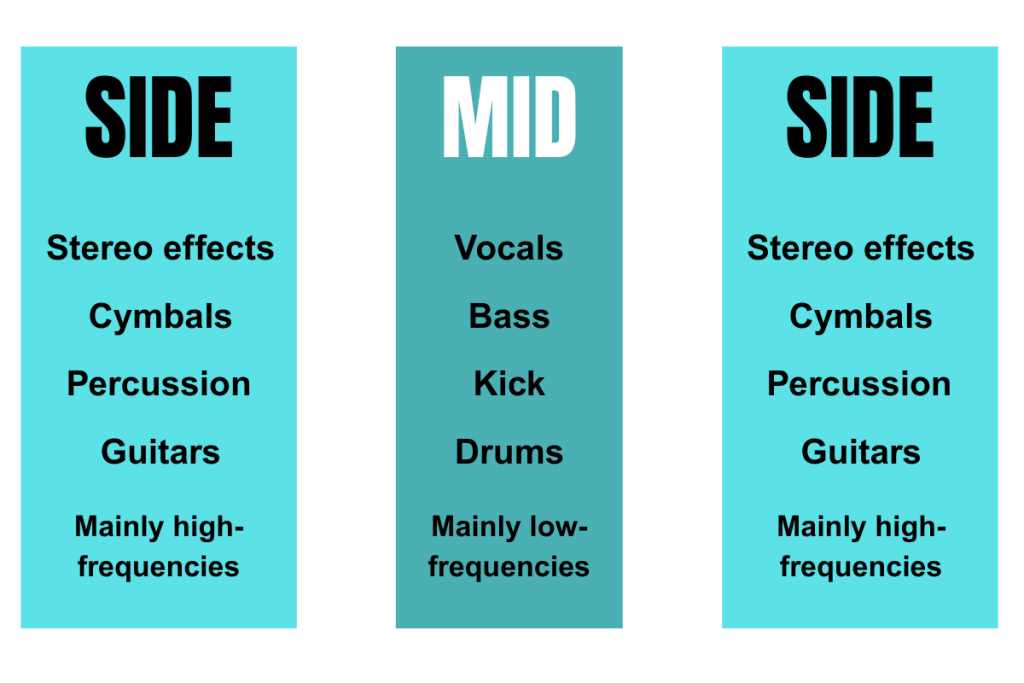
- Mid: This is everything that sits in the center of your mix. It’s the sound both speakers share. Vocals, bass, kick drum, and snare usually live here.
- Side: This is everything that makes the mix feel wide. It’s the difference between the left and right speakers. Guitars that are panned out, reverb tails, cymbals, and stereo effects often fill the sides.
A plugin or audio processor takes your normal left/right stereo track and reshapes it into these two channels—Mid and Side. You can then process them separately, giving you far more control over your mix than working in stereo alone. This type of audio processing is one of the most effective ways to get clear audio and achieve the right stereo width.
Core Benefits of Mid/Side Processing
Here are the three super-core benefits that matter the most.
1. A cleaner, tighter low end
Keeping bass and kick centered prevents low-frequency mud. Filtering out low energy from the Sides ensures the mix translates well in mono audio and on club speakers.
2. Control over stereo width
Boosting highs on the Sides adds shimmer to guitars and reverbs, creating a wide mix that feels open but still balanced.
3. Improved clarity and separation
Cutting muddiness in the Mid or taming harshness on the Sides helps each instrument sit in its own space. This makes the track sound more polished and ensures clear audio across several speakers.
How to use Mid Side processing in mixing
In mixing, mid side processing gives you control over how instruments sit in the stereo field. Instead of treating the whole track with one equalizer or compressor, you can shape the Mid (center) and Side (edges) separately.
For example, vocals, kick, and bass usually sit in the Mid. You can focus these by slightly cutting muddy frequencies around 250–400 Hz or adding a small boost around 6–8 kHz for clarity. On Sides, try a HPF at 100–150 Hz to keep sub energy centered. You can also add a gentle high-shelf boost above 10 kHz to give guitars, pads, and reverb more openness.
Another mixing use is stereo balance. If guitars dominate one side, you can adjust Side EQ to even them out without touching the vocal. Compressors in Mid Side mode are also helpful: compressing the Mid lightly keeps vocals steady, while leaving the Sides more dynamic adds movement and space.
The main goal in mixing is separation. Mid side processing lets you keep central elements strong while enhancing the width and clarity of supporting sounds, resulting in clear audio and a more polished, wide mix.
Note: Mid Side processing works by converting Left/Right into Mid (L+R) and Side (L−R), This allows EQing or compressing the center and width independently.
How to use Mid Side processing in mastering
In mastering, mid side processing is used more carefully. At this stage, the mix is already balanced, so small, subtle adjustments make the biggest difference. The goal is to improve stereo width, ensure good playback in mono audio, and create clear audio across all systems.
One common mastering move is to apply a high-pass filter on the Side channel to keep sub-bass focused in the Mid. This ensures the low end stays powerful and translates well in clubs or on phone speakers. For air, add +0.5 to +1 dB high-shelf on Sides at 10–12 kHz, then mono-check.
Mid Side compression is also useful in mastering. Compressing the Mid slightly can keep the vocal and drums consistent, while leaving the Sides more open helps maintain width. The opposite approach, compressing the Sides, can control overly wide choruses that might collapse in mono.
Another key use is fixing tonal balance. If the mix feels boxy in the center, a small Mid cut around 300 Hz can help. If the sides are too sharp, a Side dip around 6–8 kHz smooths things out.
In mastering, subtlety is everything. Even half a decibel can make the difference between a flat master and one that feels powerful, open, and well-balanced. If mastering feels tricky or time-consuming, Remasterify can help you get a polished, consistent master quickly and affordably.
Pitfalls to Avoid
Even though Mid Side processing is powerful, it’s also easy to misuse. Here are the main pitfalls beginners should watch out for:
Over-widening the mix
- Boosting the Sides too much can make the mix sound hollow or disconnected. The Mid (vocals, kick, bass) may lose impact, and the track might not translate well on smaller systems.
- Tip: Keep Side boosts subtle—often +1 dB is enough.
Ignoring mono compatibility
- In mono audio, Sides collapse. If you’ve pushed too much information there, parts of your mix may disappear or sound weak.
- Tip: Always ensure that your mix in mono-compatible.
Messing up vocal or snare focus
- The vocal and snare need to stay centered. Cutting or boosting in the Mid carelessly can shift their balance or make them sound thin.
- Tip: Make very small moves in the Mid channel and A/B often.
Fixing problems that should be solved earlier
- M/S won’t repair poor arrangement, bad mic placement, or sloppy mixing. If guitars are too loud, lower them in the mix instead of cutting Mid EQ later.
- Tip: Use M/S for polish, not as a band-aid.
Making large EQ or compression moves
- In mastering, especially, even a 0.5 dB change can be huge. Too much Mid compression can flatten the song, while too much Side compression can kill the wide mix.
- Tip: Think “tiny and precise” rather than “big and bold.”
Monitoring Guidance (Practical Fixes)
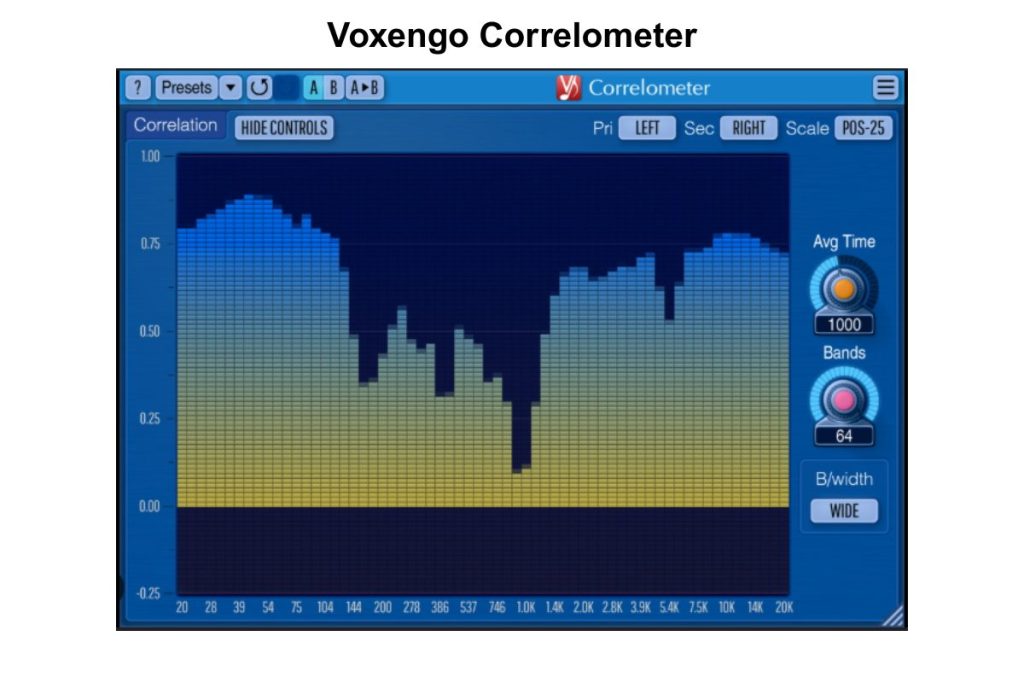
Proper monitoring is the key to safe mid/side processing. Always toggle your mix to mono while making changes. If parts vanish or the balance feels weak, you may be pushing too much into the Sides. Use a correlation meter as a visual check—values close to +1 mean good mono compatibility, while anything near 0 or negative signals possible phase problems. Another good habit is to solo the Mid and Side channels when making EQ moves. This helps you hear exactly what you’re boosting or cutting and prevents over-correcting. Keep moves subtle, then return to full stereo and A/B your changes. With these checks, you’ll catch issues early and keep your mix wide yet stable.
Frequently Asked Questions about Mid/Side Processing
What is the mid-side theory?
Not really. Mono tracks don’t have width, so splitting them into Mid and Side adds nothing. Stick with regular EQ and compression. M/S works best on stereo tracks, full mixes, or busses where there’s actual space to control.
How much width is too much?
If your mix sounds hollow, vocals lose strength, or mono playback feels thin, you’ve gone too far. Use Sides sparingly—small boosts of 0.5–1 dB usually add enough width. Always A/B in mono to be sure your mix still holds together.
What’s the difference between M/S and panning?
Panning moves individual instruments left or right. Mid/side processing shapes the overall center (Mid) and width (Side) of the mix. Use panning for instrument placement, and M/S for tonal balance and stereo control across the whole track.
What are the benefits of mid-side EQ?
Mid Side EQ lets you clean and shape your mix more precisely. You can tighten low frequencies by filtering Sides, brighten edges without touching vocals, or reduce harshness in specific areas. The result is better clarity, balance, and width without over-processing the entire stereo track.
Is Mid Side processing necessary?
No, it isn’t mandatory. Many mixes sound great with standard stereo tools. Mid Side processing is most useful when you need subtle control over the center and width—like focusing vocals in the Mid while adding air to guitars or reverb in the Sides. Think of it as optional polish.
When to use mid-side compression?
Use Mid Side compression when you want different control over the center and edges. For example, compressing the Mid lightly can keep vocals and drums consistent, while leaving the Sides more open preserves width. It’s especially handy in mastering for subtle balance without altering the entire mix.
Conclusion
By separating the center from the edges, you gain control over balance, clarity, and space in ways that ordinary stereo tools can’t offer. The key is to stay subtle—gentle adjustments can completely change how a mix feels without drawing attention to the process itself.