In this blog, we’ll show you exactly how loud your mastered song should be. You’ll learn what LUFS is, why it matters, and how it affects your music on platforms like Spotify and Apple Music. We’ll give you clear loudness targets by genre, explain how to measure them using the LUFS meter, and share tips to boost loudness without killing your sound.
You’ll also understand the average loudness level of mastered songs, so you can match industry standards without over-compressing your mix. Whether you make rock, EDM, or hip-hop, this guide keeps things simple and practical. No guessing. No fluff. These are just real answers to help your music sound loud, clean, and professional, every time.
Table of Contents
- What Is LUFS
- Recommended Loudness Levels for Mastering
- LUFS Targets by Genre
- True Peak and Output Ceiling Settings
- How to Measure Loudness with a LUFS Meter?
- Practical Techniques to Increase Loudness
- Loudness Optimization for Streaming Platforms
- Loudness Strategy Tips for Mastering
What Is LUFS?
LUFS and How It’s Measured
LUFS stands for Loudness Units Full Scale. It measures the average loudness of a track based on how humans actually hear sound. It doesn’t just look at volume peaks. Instead, it calculates loudness across the entire track, factoring in both quiet and loud parts.
You measure LUFS using a loudness meter or a LUFS meter. These tools show you values like Integrated LUFS (the full track), Short-term LUFS (last few seconds), and Momentary LUFS (real-time). The most important one for mastering is Integrated LUFS. It tells you the overall loudness level your track will be judged by, especially on streaming platforms.
If you’re aiming for a professional sound, LUFS Meters helps you avoid loudness guesswork.
LUFS vs dBFS vs RMS
Not all loudness meters measure the same way. Here’s a quick breakdown:
- dBFS (Decibels Full Scale) measures peak levels. It tells you how close your signal is to digital clipping (0 dBFS).
- RMS (Root Mean Square) gives a basic average level, but it doesn’t reflect human hearing very well.
- LUFS, on the other hand, was designed for this exact purpose. It uses filters that mimic the human ear’s sensitivity across frequencies. That’s why it’s now the industry standard.
A track can hit high peak levels (in dBFS) and still sound quiet if its average loudness is low. That’s where LUFS comes in. It gives you the real picture of how loud your track feels, not just how loud it measures.
Why LUFS Is Used in Mastering
Today, nearly every major platform uses LUFS to control playback volume. Spotify, YouTube, and Apple Music all use loudness normalization. That means they adjust your track’s volume to match a specific LUFS level, usually around -14 LUFS.
If your song is too loud, the platform turns it down. If it’s too quiet, it might get turned up, but it could still sound weak compared to other tracks. By mastering to a proper audio mastering level, you keep your song competitive without over-compressing it. Using the LUFS meter ensures your music holds its own on playlists. It’s the key to a polished, loudness-balanced master that sounds great everywhere.
Recommended Loudness Levels for Mastering
Target Audio Mastering Levels and LUFS Ranges
There’s no one-size-fits-all number when it comes to loudness. But there are safe LUFS ranges that most mastering engineers follow, depending on the genre and style.
Here are general audio mastering levels you can use as a guide:
- Jazz / Classical / Acoustic: -14 to -12 LUFS
- Rock / Pop / Country: -13 to -10 LUFS
- Hip-Hop: -10 to -7 LUFS
- EDM / Electronic: -10 to -6 LUFS
Tracks with more natural instruments usually stay more dynamic and sit at the quieter end. Heavily produced tracks, like electronic or trap music, can be mastered louder without sounding bad.
Stick to these ranges to keep your song mastering in line with what listeners expect.
-14 LUFS Is a Guideline, Not a Rule
You’ll often hear that Spotify recommends –14 LUFS. That’s true, but it doesn’t mean you should always master your song at that level.
Streaming platforms normalize volume to make tracks sound more even. But they don’t do it perfectly. If your song hits exactly -14 LUFS, it might sound quieter than other commercial tracks, especially in genres where louder is the norm.
That’s why most producers push their masters a bit louder, usually closer to -11 or -10 LUFS to match the perceived loudness of other songs.
So, use -14 LUFS as a reference point, not a hard rule.
Balance Loudness and Clarity
Louder isn’t always better. Push too hard, and you lose punch, depth, and clarity. But go too quiet, and your track feels lifeless.
The goal of mastering is to make your track sound powerful and professional without over-compressing it. Use a loudness meter or loudness analyzer to help you find that sweet spot.
You can also check loudness penalties using tools like Youlean’s Loudness Penalty Analyzer. This tells you how much streaming services will turn your track down; so you know if you’re going too far.
In mastering, you’re not just chasing volume. You’re crafting a balanced, clean, professional sound that holds up on every platform.
LUFS Targets by Genre

Acoustic/Live Music: -14 to -12 LUFS
Genres like jazz, folk, and classical need space to breathe. These tracks rely on dynamic expression, not sheer loudness. Aim for -14 to -12 LUFS. This keeps the performance natural and avoids over-compression. Pushing louder can flatten the dynamics and ruin the vibe.
Rock/Pop/Country: -13 to -10 LUFS
For mainstream genres like rock, pop, and country, balance is key. These songs need impact but shouldn’t feel squashed. Aiming for -13 to -10 LUFS usually works well. It gives your track enough power while preserving clarity and punch.
Hip-Hop: -10 to -7 LUFS
Hip-hop often sits louder because of its tight drums and bass-heavy production. A range of -10 to -7 LUFS keeps the energy high without sacrificing low-end depth. Go louder only if your mix is clean and can handle it.
EDM/Electronic: -10 to -6 LUFS
Electronic genres can take more loudness. In fact, some EDM tracks push beyond -6 LUFS. For most, -10 to -6 LUFS is the sweet spot. Just be careful: going too loud can introduce distortion, especially on bright, layered tracks.
Read more>> How to Tell If Mastering a Song Went Wrong?
True Peak and Output Ceiling Settings
What Is True Peak?
True peak measures the highest point your audio signal reaches between digital samples. It’s different from regular peak meters, which only check sample values. Why does this matter? Because when your track gets converted to MP3 or AAC for streaming, those “in-between” peaks can cause distortion, especially if your master is too hot.
This is where inter-sample peaks become a problem. Your DAW might show you’re safely below 0 dBs, but after conversion, clipping still happens.
Recommended True Peak Limits
To stay safe, mastering engineers don’t output tracks at 0 db. Instead, they leave headroom. Here are common true peak ceiling settings:
- -1.0 dBTP: Standard for most streaming platforms
- -1.5 to -2.0 dBTP: Safer if your track is louder than -14 LUFS
- -0.3 to -0.5 dBTP: May be acceptable for CD or non-streamed use
If you’re pushing your master louder (e.g., -8 LUFS or higher), use at least -2.0 dBTP to avoid distortion after transcoding.
Read more>> True Peak 101: Everything You Need to Know
How to Set It
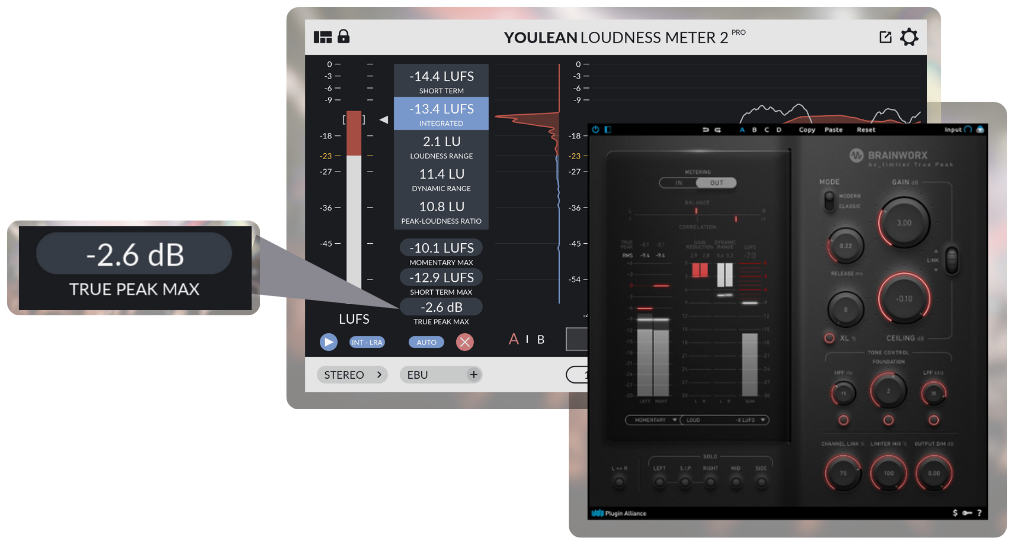
Use a true peak limiter, like the one in Youlean Loudness Meter or BX Limiter True Peak. These plugins detect and catch inter-sample peaks by oversampling your audio. Set your limiter’s output ceiling based on your LUFS Meter level and platform target.
For example, if your track is mastered at -10 LUFS and going to Spotify, set your ceiling to –2.0 dBTP.
It’s a simple step that can save your master from sounding broken after upload.
How to Measure Loudness with a LUFS Meter?
What Is a Loudness Meter?
A loudness meter (or LUFS meter) measures how loud your track sounds over time. It gives you real-time and average loudness readings, helping you stay within your target range. Unlike a peak meter, it reflects how listeners perceive volume, not just the loudest spike.
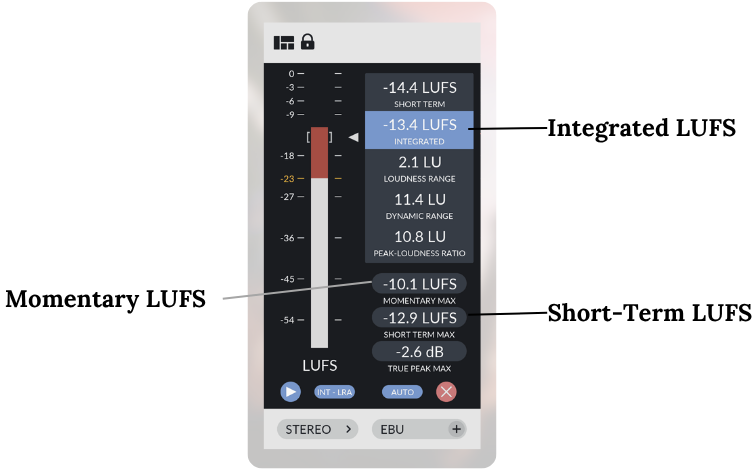
There are three key LUFS meter readings you need to understand:
- Integrated LUFS: Average loudness of the full track (most important for mastering)
- Short-term LUFS: Loudness over the last few seconds
- Momentary LUFS: Instantaneous loudness in real time
For mastering, you mainly want to watch the Integrated LUFS value.
Use the Youlean Loudness Meter
The Youlean Loudness Meter is one of the best free tools for measuring loudness. It’s beginner-friendly and offers all the key LUFS Meter readings.
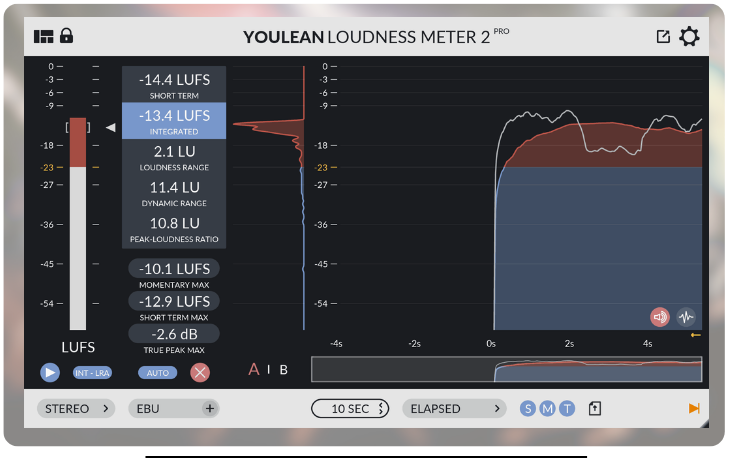
How to use it:
- Load it on your master output channel.
- Play your entire track from start to finish.
- Check the Integrated LUFS Meter reading; it shows your track’s overall loudness.
- Look at the True Peak value to ensure you’re not clipping.
- Compare your LUFS value to your genre target (e.g., -10 LUFS for pop).
This process helps you know exactly where your track stands before publishing it.
Bonus: Compare Loudness Across Tracks
Tools like Youlean or loudness analysers (like Metric AB) also let you compare your track to reference songs. This is useful when you want your music to match the average loudness level of mastered songs in your genre.
If your track falls outside the expected LUFS range, you’ll know where to adjust.
Practical Techniques to Increase Loudness
Use EQ to Boost Perceived Loudness
Loudness isn’t just about LUFS. It’s also about how the human ear hears sound. Boosting certain frequencies can make your track feel louder without raising the actual LUFS reading.
Here’s what works:
- Brighten the highs slightly (3–6 kHz range)
- Tighten the low end (80–120 Hz) to add weight
- Avoid muddy low-mids (200–400 Hz)
These tweaks improve perceived loudness and help your track sound cleaner and more powerful at the same time.
Use a Clipper Before Your Limiter
A clipper chops off fast peaks before they hit your limiter. This gives you more control and reduces strain on the limiter. It’s a clean way to gain extra loudness without distortion, especially in punchy genres like hip-hop and EDM.
How to use it:
- Set the clipper to cut just the highest transients
- Don’t overdo it; too much clipping sounds crunchy
- Follow it with a limiter for final control
Clipping + limiting = louder masters with fewer trade-offs.
Limit in Stages, Not All at Once
Instead of using one limiter to do all the work, try using two or three limiters with small gain reductions.
For example:
- Limiter 1: tame the peaks by 1–2 dB
- Limiter 2: gently increase loudness by another 1–2 dB
- Limiter 3 (optional): finalize output with a clean ceiling
This multi-stage limiting helps avoid pumping, distortion, and over-compression. This is a common problem when you push one limiter too hard.
Control Dynamics with Compression
Light compression across mix buses can tighten the track before mastering. It smooths out dynamic jumps so your limiter doesn’t have to work as hard later.
Use settings like:
- Ratio: 2:1 or 3:1
- Slow attack, medium release
- Just 1–3 dB of gain reduction
This keeps your mix punchy, not squashed.
Don’t Ignore Saturation and Dynamic EQ
- Saturation adds harmonic content, making tracks sound richer and louder.
- Dynamic EQ can tame harsh frequencies that pop out when limiting.
These tools help preserve clarity and tone, even at higher audio mastering levels.
Loudness Optimization for Streaming Platforms
How Streaming Services Handle Loudness
Streaming platforms like Spotify, Apple Music, and YouTube don’t play songs at their original volume. Instead, they normalize all tracks to a target loudness, usually around -14 LUFS Integrated.
That means if your track is louder than -14 LUFS, the platform turns it down. If it’s quieter, it might get turned up. But there’s a catch: the dynamic feel and tone of your track can still suffer if it’s not mastered with this system in mind.
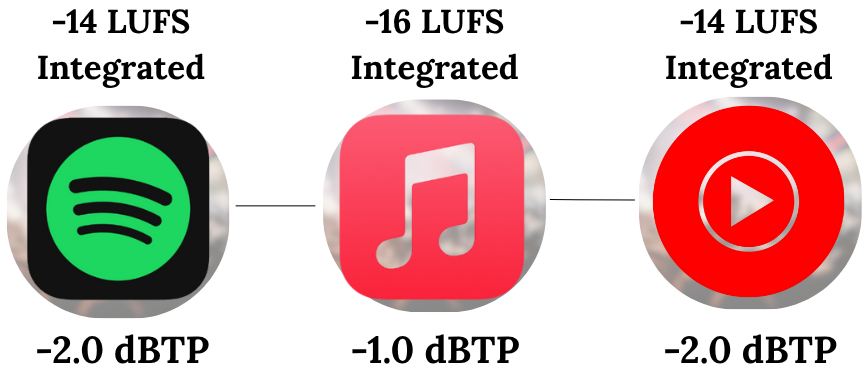
| Platform | Common normalization reference (Integrated) | Turns loud tracks down? | Turns quiet tracks up? | Recommended True Peak ceiling |
| Apple Music (Sound Check) | ~−16 LUFS | Yes | Often yes (within limits) | ≤ −1 dBTP |
| Amazon Music | ~−14 LUFS (some cite ~−13) | Yes | Often no (varies by implementation) | ≤ −1 to −2 dBTP |
| Spotify | ~−14 LUFS (user settings can be −19/−14/−11) | Yes | Depends on mode | ≤ −1 dBTP |
| YouTube | ~−14 LUFS | Yes | Usually no | ≤ −1 dBTP |
| Deezer | ~−15 LUFS | Yes | Varies | ≤ −1 dBTP |
Avoiding Loudness Penalties
A loudness analyser, like the Youlean Loudness Penalty tool, shows how much different platforms will adjust your track’s volume. This helps you decide how far you can push loudness before it backfires.
Here’s what you want to avoid:
- Over-limiting to sound louder than everyone else
- Getting turned down by -4 dB or more on streaming services
- Losing punch and clarity due to poor dynamics
Aim to master your track so that it sits comfortably around your genre’s expected LUFS range, while keeping your true peak at or below -1.0 dBTP (or -2.0 if mastering hotter).
Optimize for Real-World Playback
Always test your track using a LUFS meter or a plugin that emulates platform playback. Tools like Youlean Loudness Meter or Adapter Audio Streamliner let you hear your track as it will sound on Spotify or YouTube. This is the best way to make sure your master doesn’t just look good on a meter, but actually sounds good on playlists, phones, speakers, and more.
What LUFS should I master for Apple Music Sound Check?
A practical target many engineers use for Apple Music is around −16 LUFS integrated. That’s close to where Apple’s loudness normalization is often described, so you’re less likely to get turned down (and less likely to over-limit your track for no benefit).
If you’re making one master for all platforms, landing somewhere around −14 to −16 LUFS integrated is a common “safe zone” that keeps your master competitive without forcing you to crush dynamics.
What True Peak should I aim for on Apple Music?
A widely used guideline is keeping your True Peak ceiling at −1 dBTP or lower. This helps reduce the chances of clipping after codec conversion (AAC) and playback processing.
If your master is very bright, very dense, or heavily limited, you can go a little more conservative (extra headroom), but −1 dBTP is a solid baseline.
What LUFS does Amazon Music normalize to?
A practical reference target people commonly work around for Amazon Music is about −14 LUFS integrated (you’ll sometimes see slightly different numbers mentioned depending on source and playback mode).
The key point: Amazon-style normalization generally means super-loud masters don’t stay super-loud, they often just get turned down.
What True Peak should I use for Amazon Music?
For streaming-friendly masters, −1 dBTP is a common ceiling. Some engineers prefer −2 dBTP on Amazon (or in general) to be extra safe with codec/headroom, especially if the master is aggressive and heavily limited.
If you’re unsure, start with:
- TP ≤ −1 dBTP (standard, widely used)
- TP ≤ −2 dBTP (more conservative, “safer”)
Loudness Strategy Tips for Mastering
Utilize Reference Tracks
Before you finalize a master, reference your favorite tracks in the same genre. Drop them into your DAW. Compare them directly using a loudness meter or loudness analyser like Metric AB or Youlean.
Answer these questions:
- Does your track match the average loudness level of mastered songs in your genre?
- Does it sound just as full, bright, and punchy?
- Are your dynamics too squashed or too loose?
Use your ears first. Then check your LUFS meter and true peak numbers to back it up.
Master to Context, Not Just a Number
While master, you should go by the way art works. Your LUFS target should match the context of the release. Is this a club banger? Push it harder (maybe -7 LUFS). Is it a chill acoustic track? Keep it more dynamic (-13 LUFS works well).
Don’t master everything to -10 LUFS just because “it’s loud.” Loudness only works if it fits the vibe.
Structure and Arrangement Can Boost Perceived Loudness
Here’s a trick: build dynamic contrast into your song. If your track starts soft and builds up, the louder parts feel more intense, even if LUFS stays the same.
This works well on platforms like Spotify. Why? Because they calculate Integrated LUFS across the full track. A quiet intro can let the drop hit harder without getting turned down as much.
Finally, Don’t Overthink the Meter
Yes, LUFS is important. But don’t mix for the meter. Mix for the professional sound you want. Use your LUFS meter to confirm your choices, not control them.
Mastering is both science and feel. Keep your ears in charge.
Summing up
Mastering with LUFS in mind helps your music sound polished, consistent, and competitive across all platforms. Know your genre’s loudness range, aim for the right LUFS level, and keep your true peaks in check. Use tools like LUFS meters and loudness analysers to measure and refine your sound, not to chase numbers, but to serve the music.
Remember, louder isn’t always better. Balance matters more than raw volume.
If you want to speed up your workflow and get your loudness right every time, Remasterify gives you the guidance and tools to make that easy. Whether you’re mastering hip-hop, rock, or EDM, it’s designed to help you get that clean, pro-level finish without the guesswork.
Use your ears. Check your meters. Master smart.
###