“That dusty track from the ’90s? It deserves an AI Remaster.”
In this guide, we’ll walk you through a clear, step-by-step approach to AI remastering, from cleaning up audio artifacts to preparing final masters ready for streaming. If you’re ready to modernize your sound while preserving its soul, you’re in the right place.
There’s a saying ‘Old is Gold’; but that that gold may have some tarnish overlay. Maybe it’s a song you, or your favourite singer recorded years ago, or a live performance captured on an old mic (yes, that’s how gold memories are created). But to be honest, they don’t always sound great by today’s standards. You might notice some unwanted traits like:
- Background hiss or hum
- Muffled vocals
- Harsh highs or sudden lows
- Uneven volume
Back then, those recordings were best, we agree; but when you compare them with today’s recording, those are not up-to-standard (though those are still gold to your ears).

Table of Contents
- What Makes Old Recordings Sound Outdated?
- Why Modernize Now with AI Remaster Tools
- Step-by-step guide to the AI Remastering process
- Frequently Asked Questions
What Makes Old Recordings Sound Outdated?
The raw performance of the old songs with an unappareled emotional delivery is a place of warmth to those who understand those songs’ value. But the question is: Why does this happen? It’s not because the music was bad; it’s because the technology of the past had limits, and time hasn’t been too kind to the formats used.
1. Limitations of Analog Tape
Most vintage tracks were recorded on analog tape, which introduced natural hiss (a soft noise in the background), saturation, and occasional pitch inconsistencies. While some of these quirks add charm, they often mask clarity and reduce dynamic range.
Over time, these quirks became part of the sound. But in a modern mix, they can make your music feel muddy or outdated. That’s why those songs need to get AI remastered.
2. Audio Artifacts from Aging Formats
Old recordings were often stored on cassette tapes, or any other physical formats. That’s why as they start wear out, they start adding noises that weren’t there at all in the original format. Some buzzing, crackles, pitch sifting, or even some momentary silence.
These artifacts break the listening experience, and that makes them ‘inappropriate’ for uploading on YouTube or Spotify. So, after those old songs remastered, you can publish them on popular streaming platforms.
3. Narrow Frequency Response
Recordings of few decades ago may sound flat today, the equipment couldn’t capture the full range of frequencies. They may miss the deep, or the high-end sparkle might be captured too soft. That’s why, today’s listeners may not get the ‘wow-factor’ in those old recordings, as they are habituated with listening to modern recordings filled with immersive detail.
4. Quieter Loudness Levels
Songs from the past were mixed with a focus on dynamic range. That actually worked well with the then formats like vinyl or tape. But think of today’s scenario. We listen in louder, more compressed environment. Our listening devices have a variety – sometimes it’s phone, sometimes it’s car, again sometimes some quality headphones. As a result, old tracks often sound weak or too quiet to our ears.
So, these are the facts that drawing the sonic limitations in those old recording. Then there are two ways to solve these issues:
- The Traditional Way: Go to a Studio, spend thousands of dollars to hire audio engineers and get those songs mastered.
- The Smart Way with AI: Yes, today it’s possible. You don’t have to spend bulk of bucks to recreate your nostalgia. Remasterify AI can do that for you, without any hassle. Now let us ask why you’d use remaster audio online AI tools to modernize old songs.
Why Modernize Now with AI Remaster Tools
Digitally remastering old tracks isn’t just a passion project anymore—it’s a smart move for anyone who wants their music to stay relevant and competitive.
1. AI Makes the Remastering Process Faster and Smarter
Traditional audio remastering process required expensive gear and trained ears. With AI remastering, intelligent algorithms handle tasks like noise reduction, EQ correction, and dynamic balancing in minutes—giving you clean, professional results without needing a full studio setup.
2. Bring Vintage Tracks Up to Streaming Standards
Modern platforms expect loud, clean, balanced audio. Remastering AI tools help your older tracks match current playback expectations across Spotify, Apple Music, and YouTube, without stripping away their original feel.
3. Expand Monetization Opportunities
By upgrading legacy recordings, artists and labels can re-release refreshed versions of classic albums or unreleased demos. AI remaster tools make it easy to prep old catalogs for sync licensing, playlist pitching, and anniversary editions.
4. Preserve and Protect Timeless Recordings
Converting and enhancing material from aging formats like analog tape ensures they’re preserved in high quality before physical degradation sets in. With AI remaster process, you’re not just polishing the past—you’re unlocking its full potential for the present and future.
Step-by-step guide to the AI Remastering process
You don’t need to re-record the old track. If you’ve decided to make them revive again, here’s a step-by-step guide on how to remaster old songs. Even if you’re a beginner here, you don’t need to worry; you will be able to do them on your own.
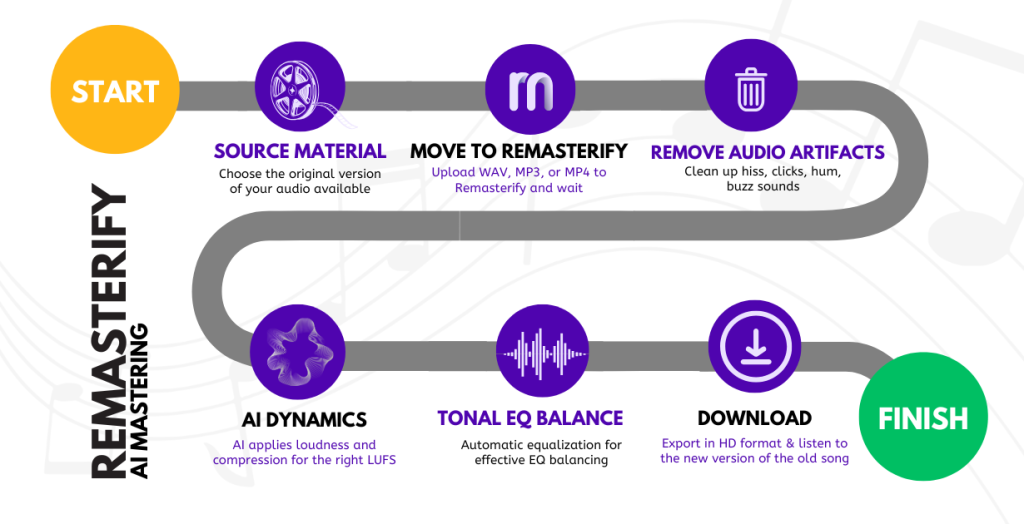
Step 1: Select Your Source Material Wisely
The quality of your AI remaster depends mostly on the source you’re starting with. If the original recording is weak, distorted, or too compressed, even the best remastering AI tools won’t perform miracles.
Here’s how to get it right from the start:
- Use the highest-quality version available. Look for the original mixdown, master tape, or high-resolution digital copy—avoid low-bitrate MP3s or ripped files.
- Digitize properly if you’re using analog tape. Use a reliable tape deck and high-quality audio interface to convert your analog tape into a clean digital format (WAV or AIFF preferred).
- Check for physical damage. Scratches, dropouts, and stretched tape can introduce additional audio artifacts that may need extra cleanup later.
- Avoid processed versions. Steer clear of recordings that have already been heavily EQ’d or limited—they leave less room for clean enhancement.
A clean starting point gives your audio remastering process the best chance at success, ensuring the AI has enough fidelity to work with.
Step 2: Use AI Tools to Analyze the Audio
Once you’ve secured a clean source, it’s time to bring in the tech. AI remaster features scan your audio, detect problem areas, and suggest smart enhancements, all based on deep audio analysis. Let’s take Remasterify as a reference.
How Remasterify Handles Audio Analysis
When you upload a track to Remasterify, the platform automatically runs a highly detailed analysis to understand the condition of your recording.
- Frequency Balance: It identifies frequencies using highly advanced AI models and adjusts the tonal balance accordingly.
- Dynamic Range: It checks for uneven sections and ensures that the sound dynamics stay consistent throughout.
- Stereo Width: It evaluates whether your mix feels too narrow or unbalanced in the stereo field.
- Loudness Levels: It ensures your track is aligned with industry standards like -14 LUFS, essential for streaming services.
Tips for Best Results:

Remasterify handles the analysis phase so you can create a cleaner, more modern version of your old track. To learn about the best mastering processes, read this blog.
Step 3: Clean Up Audio Artifacts
Before enhancing the sound, it’s essential to remove anything that’s not supposed to be there. This step focuses on eliminating unwanted noise and distortions, also known as audio artifacts, that commonly plague old recordings.
What Kind of Artifacts Are We Talking About?
Whether your track came from analog tape, vinyl, or an early digital source, these are the usual suspects:

How Remasterify Handles Artifact Cleanup
Once the initial analysis is done, Remasterify applies intelligent cleanup modules that:
- De-noise the background without dulling your mix
- Detect and suppress clicks or dropouts while keeping transients intact
- Correct pitch warbles from older tape formats
- Preserve vocal and instrumental clarity even after removing noise layers
The best part? With Remasterify, you have direct control over the Noise Reduction level using a simple slider interface. Choose between settings like Lowest, Low, Medium, High, or Highest.
Step 4: Enhance Dynamics and EQ Balance
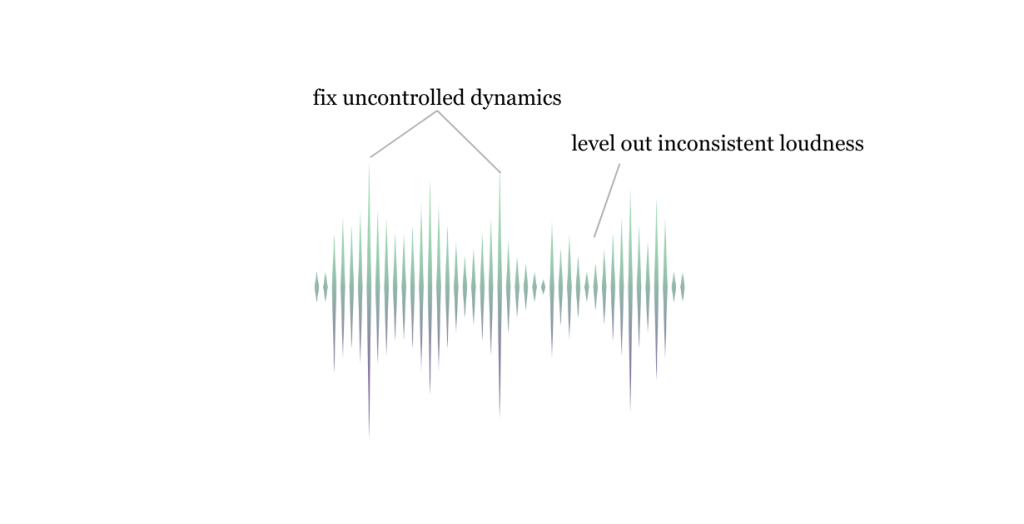
After cleaning up audio artifacts, it’s time to enhance the overall impact of your track. This means improving dynamics—how loud and punchy the track feels—while also making sure it meets today’s streaming requirements.
How Remasterify handles Dynamic Enhancement
In Remasterify, you’ll find a Mastering Intensity control that adjusts how aggressively the AI applies loudness and compression. It operates in LUFS (Loudness Units relative to Full Scale), a standard used by major platforms like Spotify and YouTube.
For example:
- A setting of Low might result in around -10.3 dB LUFS, preserving more natural dynamics.
- Higher settings will make the track sound louder and more forward, ideal for modern pop or rock releases.
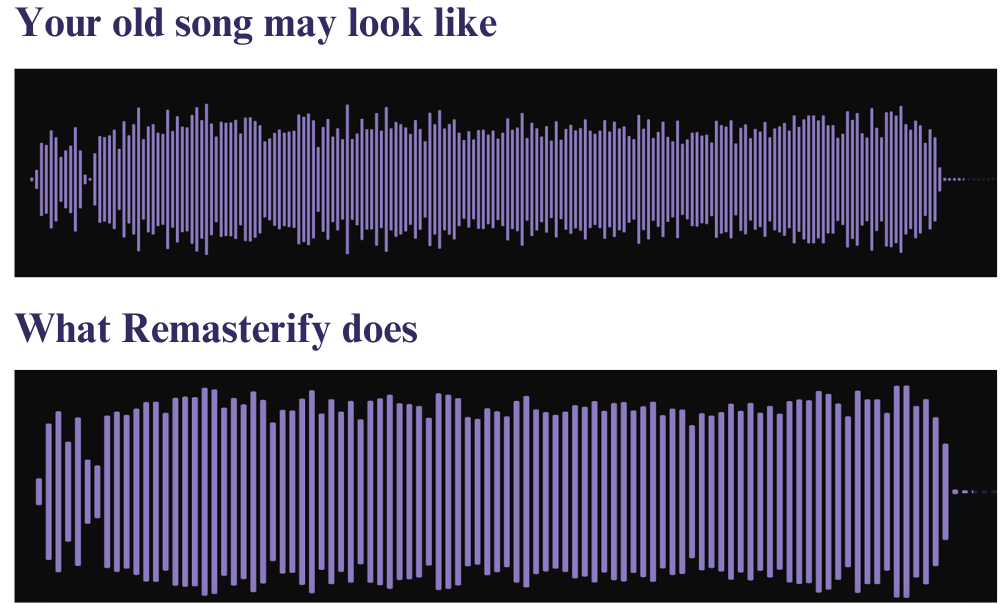
Why You Need This
Most older recordings, especially those on analog tape, were mastered for vinyl or cassette, which favored dynamic range over volume. Today, a remastered track that sits around -14 to -9 LUFS will sound balanced across streaming platforms.
Tips for Using Mastering Intensity in Remasterify
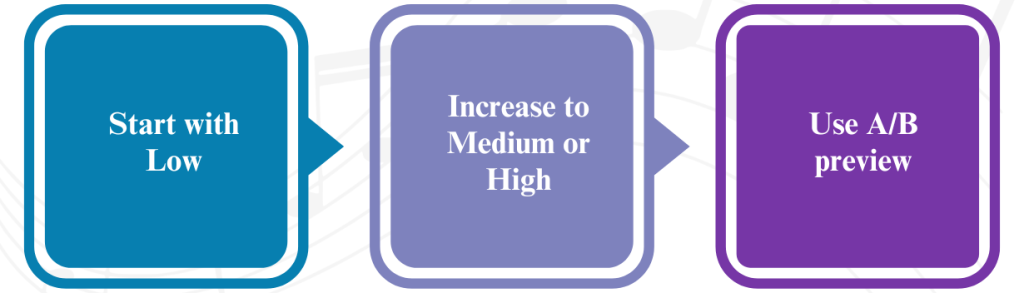
- Start with Low if you’re working on vintage jazz, folk, or orchestral pieces.
- Increase to Medium or High for tracks meant to compete with modern chart releases.
- Use A/B preview to compare different intensity levels and avoid over-compression.
With a few clicks, the detailed AI remastering process in Remasterify gives you dynamic polish.
Step 5: Refine Tonal EQ Balance
Once your dynamics are dialed in, the next step is shaping the tone. With Remasterify, you can do this through any of these: Automatic Equalization, or Custom EQ controls. It totally depends on how hands-on you want to be.
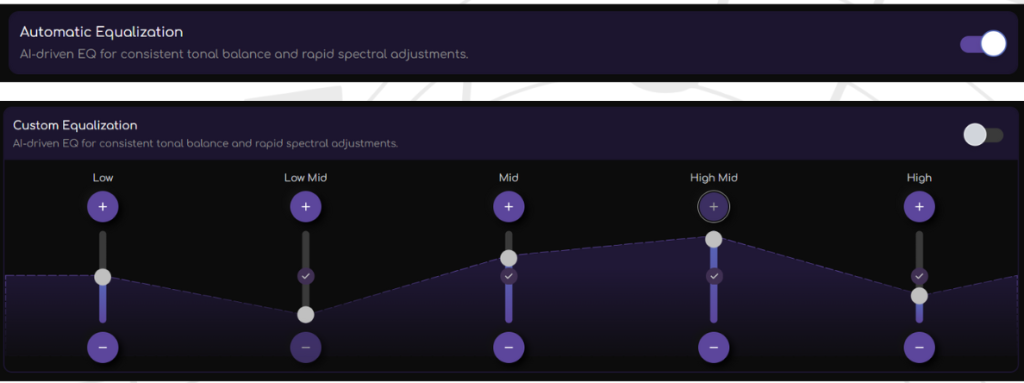
Option 1: Automatic Equalization
Remasterify’s AI-driven EQ mode takes care of tonal balance for you. Just switch it on, and the system will analyze your track’s spectral content and apply adjustments to:
- Reduce harsh frequencies
- Boost weak tonal areas
- Ensure smooth transitions across the frequency spectrum
This is great for quick, consistent audio remastering, especially if you’re not confident with manual EQ work.
Option 2: Custom Equalization
Prefer to tweak the details yourself? Remasterify’s Custom Equalization lets you adjust manually.
You can increase or reduce each frequency range with simple plus-minus controls. This gives you more creative control, especially if you want to preserve certain sonic textures from the original recording or reduce overbearing tones caused by analog tape aging.
Tips for Effective EQ Balancing
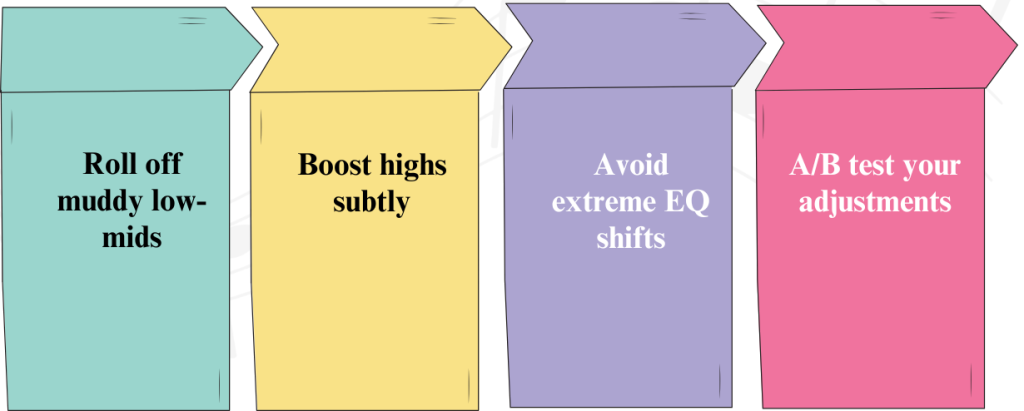
Whether you go automatic or custom, this step ensures your remastered track not only sounds clean, but also emotionally resonant and sonically competitive.
Step 6: Finalize and Export for Your Platform
Once your AI remaster is complete, export the track in high-resolution formats like WAV or HD WAV. Use Remasterify’s metadata tagging if available, and make sure your audio remastering meets platform-specific specs. This ensures your modernized track sounds polished across Spotify, Apple Music, YouTube, or even archival use.
Final Thoughts
Modernizing old recordings doesn’t have to be complex or expensive. With tools like Remasterify, the remastering process becomes streamlined, letting you revive vintage audio with clarity, balance, and modern loudness—all without losing its soul. Whether you’re working with analog tape, battling audio artifacts, or prepping a catalog for streaming, AI remastering offers speed, precision, and accessibility.
From clean-up to dynamics to EQ, each step ensures your track meets today’s standards while preserving what made it special in the first place. Start remastering now—and give your old recordings the second life they deserve.
Frequently Asked Questions
Yes, absolutely. With Remasterify, you don’t need to re-record anything. Just upload the track you already have, we’ll enhance the sound quality using AI-driven mastering, while keeping the original performance intact. It’s quick, clean to remaster with AI, and preserves the soul of your recording.
Definitely. Remasterify is made for beginners and pros alike. You don’t need any prior experience. Our AI handles technical decisions like EQ, volume leveling, and clarity adjustments. You just upload, preview, and download. No knobs, no guesswork.
Yes, you can. Once your old song is digitized (via USB turntable or any audio converter), just upload the file to Remasterify to get AI audio remastered. We’ll help remove noise, balance the sound, and modernize the track while respecting its original character.
Not at all. Our AI is trained to enhance audio without stripping its character. At Remasterify, we focus on preserving the natural tone of your music, just with added clarity, balance, and loudness to meet today’s playback standards.
Not with us. Remasterify was designed to be affordable, even for hobbyists. You don’t have to have knowledge on how to remaster music. You can remaster tracks at a fraction of what a studio would charge, with pricing that fits casual users and serious creators alike. No subscriptions, no hidden fees.