You’ve finished mixing all your songs. Each one sounds great on its own. But when you play them back to back, something feels off. One track is too loud, another sounds thin, and the whole album doesn’t flow right. That’s where album mastering comes in.

It’s the final step that makes your songs sound like a complete, cohesive project. Whether you’re releasing an EP or a full-length record, mastering helps unify the tone, loudness, and dynamics. In this guide, we’ll break down what album mastering is, why it matters, and answer the most commonly asked questions.
Table of Contents
What is album Mastering and why does it matter?
Should all tracks be at the same loudness?
Stereo Mastering vs Stem Mastering
Tips for Stereo Mastering an album that sounds cohesive
How Remasterify helps with album mastering
What is album Mastering and why does it matter?
Album mastering is the final stage in music production. It ensures all your tracks work together as a complete listening experience. While mastering a song focuses on making one track sound polished and balanced, album mastering takes a wider view. It’s about adjusting loudness, tonal balance, and dynamics across all songs to create flow and unity.
For example, you might have one track that’s bass-heavy and another that’s bright and loud. Without mastering, these differences can be jarring. Good mastering smooths out those jumps without killing the character of each track.
This process matters because it’s what separates a DIY demo from a professional sound. Whether your listener is using earbuds, a car stereo, or studio monitors, mastering makes sure your music translates well across all playback systems.
Should all tracks be at the same loudness?
Not necessarily. Tracks in an album should feel consistent, but forcing them all to the same loudness level can kill their natural flow. For example, an atmospheric intro track doesn’t need to hit as hard as a punchy lead single. Instead of making everything equally loud, focus on perceived balance. Use tools like LUFS meters to check overall loudness, but trust your ears too. Normalizing audio helps, but it’s not a one-size-fits-all fix. In album mastering, the goal is to maintain dynamic contrast while still making the transitions between songs feel smooth and intentional.
Stereo Mastering vs Stem Mastering
When it comes to album mastering, one key decision is whether to use stem mastering or go with a traditional stereo master. Both methods aim to deliver a polished, professional sound, but they work differently.
Here’s a simple breakdown:
| Feature | Stereo Mastering | Stem Mastering |
| Input File | One final stereo mix | Multiple grouped stems (e.g., vocals, drums, bass) |
| Control | Limited to full track adjustments | More detailed control over mix elements |
| Use Case | Well-mixed tracks needing subtle polish | Songs needing mix correction or added clarity |
| Flexibility | Less flexible if something’s off in the mix | Can rebalance parts during mastering a song |
| Time/Cost | Faster, often cheaper | More time-consuming and usually costs more |
| Best For | Balanced mixes and tight deadlines | Complex tracks or when aiming for ultimate precision |
Use stem mastering if some tracks in your album have issues you can’t fix in the mix. For solid mixes, stereo mastering is usually enough to achieve a clean, unified sound.
Tips for Stereo Mastering an album that sounds cohesive
Making your album sound smooth from start to finish isn’t just about loudness. It’s about creating a natural, consistent flow. Here’s how to do it right:
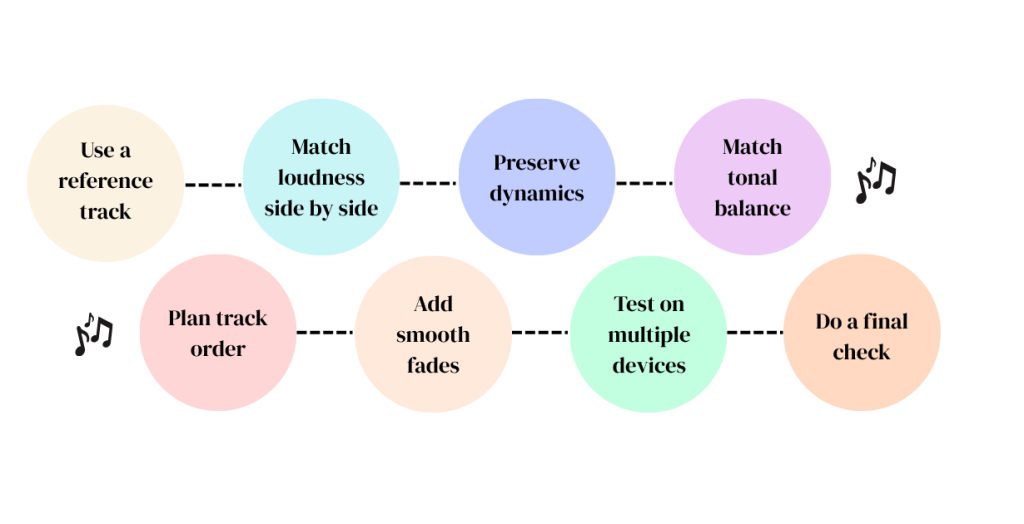
1. Use a Reference Track as a benchmark.
Pick one great-sounding song from your genre. It can be one of your own or from another artist. Use it to guide your choices for EQ, loudness, and tone across all tracks.
2. Compare side by side and adjust the loudness accordingly.
Use LUFS meters (like Youlean Loudness Meter) to keep your songs at a similar loudness level. A good target is around -14 LUFS for streaming while ensuring the peak does not extend by 2 dB. But don’t just follow numbers. Listen carefully. Your ears are the best tool for finding balance.
3. Preserve Dynamics—Don’t Overcompress
Don’t squash your tracks just to make them louder. Use light compression where needed, but let the quiet parts stay quiet and the loud parts breathe. This keeps the music natural and emotional.
4. Match the Tonal Balance Across Songs
Use EQ to balance highs, mids, and lows across songs. For example, if one track sounds too sharp or muddy next to others, adjust it slightly. Avoid big EQ changes. Small, gentle moves are safer.
5. Plan the Track Order Carefully
The order of songs matters. Think about the mood, tempo, and energy. Try to build a journey from start to finish. Keep similar tones or transitions next to each other for smoother flow.
6. Set Smooth Fades Between Tracks
Set the right amount of space between songs. Some tracks may need short fades at the end or start. This prevents sudden cuts or awkward jumps. A clean transition helps the album feel complete.
7. Test on Different Devices
Play your album on headphones, car speakers, laptops, and phones. Each system reveals different things. If the bass disappears on a phone or vocals are too harsh in a car, go back and adjust.
8. Do a Final Check Before Exporting
Before exporting the masters, check for clicks, dropouts, or noise. Ensure that song titles and metadata are accurate. Confirm that all files are in the right order.
If you’re planning a physical release (like CD), consider exporting to a DDP file format. This format preserves track order, gaps, fades, and metadata, and it’s the standard delivery format for CD manufacturing.
How Remasterify helps with album mastering

Remasterify makes album mastering simple and fast.
You can upload multiple tracks at once. The AI balances loudness, EQ, and clarity for each song. It also keeps the whole album sounding consistent and natural.
No need for advanced tools or deep technical skills. Remasterify is great for those who want quick solutions without risking quality.
It helps you avoid harsh sounds or volume jumps. Your music stays clean, clear, and smooth across all devices.
If you’re aiming for a professional sound without the complexity, Remasterify gives you that edge, with just a few clicks.
Summing up
Mastering an album takes patience, careful listening, and attention to detail. Don’t rush the process. Give yourself time to step back, listen with fresh ears, and trust your instincts. The goal isn’t perfection. Instead, it’s about how consistent and natural every song on the album sounds. When your album flows naturally and sounds balanced from start to finish, listeners stay engaged. Whether you’re doing it yourself or working with a mastering engineer, keep your artistic intent at the center. A well-mastered album doesn’t just sound good—it feels complete.