You upload your audio to Spotify, YouTube, Soundcloud, or Apple Podcasts. But when you play it back, it sounds too quiet. Or maybe the loudness changes unevenly throughout the track. Even though it seemed fine during editing. This is a common issue for creators. Most platforms use audio normalization to adjust your audio to meet their loudness standards. If your recording isn’t mastered to the right level, it will be automatically turned down.

In this blog, you’ll learn what loudness normalization is, why it makes your uploads sound quiet, and how to fix it. We’ll also show how Remasterify helps you get the right sound, fast.
What is Audio Normalization?
“Why does my audio recording become quiet after posting online?”
Audio normalization is the process of adjusting the loudness of an audio file to a consistent level. It doesn’t change the content or tone of the sound, just how loud it plays back compared to other recordings.
Most people think that turning up the volume slider does the same thing. But it doesn’t. That only affects playback on your device. Audio normalization actually adjusts the file itself so that it plays at a standard level across different platforms and devices.
There are two main types:
- Peak normalization the loudest part of your audio and raises everything to match that peak.
- Loudness normalization is more advanced. It adjusts based on how loud your audio feels to human ears, not just how high the peaks go. This is the method used by platforms like Spotify, YouTube, and Apple Podcasts.
These platforms apply loudness normalization to make sure users don’t get blasted by one upload and then barely hear the next.
To do this, they follow a standard loudness analyser called LUFS (Loudness Units Full Scale). LUFSis a standard used to measure the perceived loudness of audio to the human ear.
Why Your Uploads Sound Quiet on streaming platforms?
Platform-Specific Loudness Targets
Each platform has its own loudness target, measured using an LUFS meter. If your audio doesn’t meet these targets, it may be reduced in volume or left too quiet after uploading.
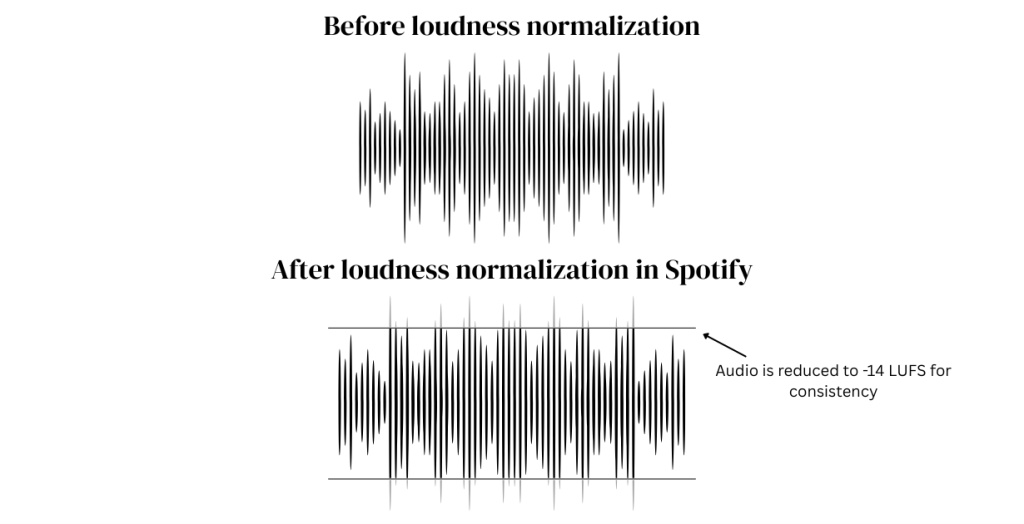
- Spotify targets –14 LUFS. If your audio is louder, it gets turned down. If it’s quieter, Spotify won’t boost it.That’s why soft masters often sound weak on Spotify.
- Apple Music and Apple Podcasts aim for -16 LUFS. Apple also considers True Peak values, which should stay below -1 dBTP to avoid distortion during encoding.
- Instagram (Reels, Threads, IGTV) doesn’t have official loudness rules. But many creators notice clipping or low volume when the audio is too loud or too soft. Staying close to -14 LUFS helps maintain a balanced sound.
- Facebook also doesn’t share exact loudness targets. However, it utilizes compression, similar to Instagram. Uploads near -14 LUFS usually sound clearer and more consistent.
- YouTube targets –14 LUFS, similar to Spotify. However, if your video’s audio is below that, YouTube doesn’t boost it. Viewers end up turning up the volume themselves.
- SoundCloud doesn’t officially normalize loudness. But tracks mastered near –14 LUFS tend to sound clearer and more consistent with others.
If your audio isn’t mastered to these targets, the platform may adjust it, and not always in your favor. Knowing these levels helps you avoid quiet uploads and gives your audience a consistent listening experience.
Why It Might Occur?
Before your audio ever reaches a platform, problems can begin in the recording or mixing stage. These issues often lead to quiet, uneven, or distorted sound after uploading.
- One common problem is low input gain. If your mic or interface isn’t set to the right level, your voice or instrument gets recorded too softly. Trying to boost it later introduces noise, making the audio feel weak.
- Poor mic placement is another issue. Recording too far from the mic leads to low volume and more room noise. Too close, and you risk clipping—that harsh, distorted sound when your signal is too loud.
- In mixing, unbalanced tracks cause problems. For example, if vocals are too soft compared to the music, or one instrument overpowers the rest. Skipping proper compression and limiting also means your audio has wide volume spikes, which makes it hard to control.
- Lastly, many creators export their mix at a low level, hoping platforms will fix it. Most won’t. If your track is underpowered, it stays that way.
To get consistent loudness, your recording needs a clean signal, good balance, and smart dynamics before mastering. That’s the foundation of a loudness Analyzer.
Fix Quiet & Uneven Loudness in Your Uploads (With Remasterify)
Fixing quiet uploads starts long before you hit “export.” It begins with how you record, mix, and master. To achieve consistent loudness across platforms, you need to check a few key boxes first, then complete the process with a solid mastering step.
Get a Good Recording from the Start
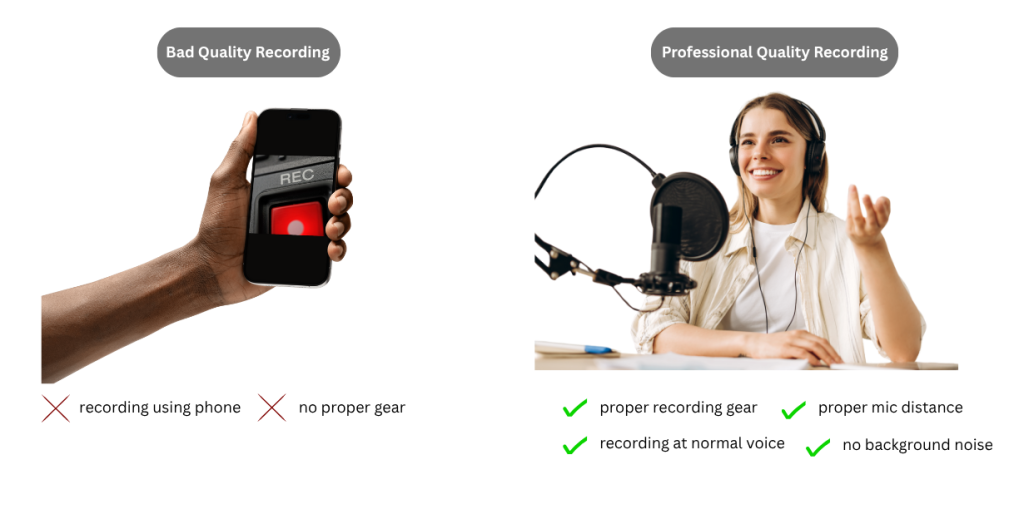
Before you start mastering your audio, it’s important to get the basics right. A clear recording gives you the best results later.
- Choose the right mic: You don’t need expensive gear, but use a microphone that fits your voice or instrument. Even a budget clip-on mic is better than using your phone’s built-in one.
- Set the volume correctly: Ensure your voice or music is neither too soft nor too loud while recording. Speak at a natural volume. If your levels go into the red, that means it’s too loud and may cause distortion.
- Record in a quiet space: Turn off fans, AC units, and other background noise. Even soft hums can affect your final sound quality.
Keep Your Audio Well-Balanced
After recording, listen to your track. Make sure no part of the audio stands out too much. Your voice shouldn’t be drowned out by background music, and music shouldn’t be louder than needed.
If something sounds too soft or too loud, adjust it before moving on. You don’t need to use special tools—just trust your ears.
The goal is to have a clean, well-balanced file before uploading it to Remasterify. That way, when you apply final mastering, your audio will come out polished, even, and ready for platforms like Spotify, YouTube, and more.
Master Your Track Now with Remasterify

This is where Remasterify enters. After preparing your mix, upload the file (in MP3, WAV, or MP4 format) to Remasterify.com.
- Use the Mastering Intensity dial to bring your file to the right LUFS level, without over-compressing or causing clipping.
- You can make use of the AI Equalizer to smooth out harsh tones and balance frequencies.
- Widen your sound using the Stereo Imaging settings.
- If background noise is still present, adjust the Noise Reduction Dial to clean it gently without compromising clarity.
Remasterify takes care of the hard stuff. The tool professionally balances your mix, applying the right compression, and mastering your audio to platform standards. You don’t need to tweak plugins or analyse graphs. Remasterify does the heavy lifting for you. It’s an ideal tool to ensure your recordings meet platform loudness standards.
Conclusion
If your audio sounds quiet after uploading, it’s likely due to audio normalization. Platforms like Spotify and YouTube adjust your audio to match their volume rules.
Quiet or uneven audio can take the impact out of your content, even if everything else looks perfect. With so many platforms applying their own loudness rules, it’s easy to get caught off guard.
However, once you understand how audio normalization works, you’re in a much better position to control the sound of your content.
Tools like Remasterify make it easier than ever to achieve clean, balanced, and platform-ready audio. Sound matters. And with the right tools, your audio can finally match the quality of your content.