Ever recorded a song at home and felt like your voice sounded too sharp or even painful to listen to? You’re not alone. That harsh, ear-piercing tone is often caused by something called harsh frequencies. The good news? You don’t need to learn complicated audio terms or buy expensive gear to fix it.

In this blog, we’ll show you how to make your vocals sound smoother and easier to listen to—using simple, beginner-friendly tips. Whether you sing covers or create original music, you’ll learn how to get a cleaner, more professional sound from your DIY vocal recording.
Table of Contents:
Simple Fixes You can Try while Recording
Quick Solutions without Getting Technical
What are Harsh Frequencies?
Harsh frequencies are those parts of the audio that sound sharp, piercing, or too bright in a song recording. You might notice it when certain words — like ones with “S,” “T,” or “Ch”—feel too strong or even painful to hear.
This isn’t about your singing. It’s how your mic and room capture your voice. Small rooms, hard walls, and cheap mics often make high frequencies stand out too much. That’s where the harshness comes from.
If your vocals sound hissy, thin, or tiring to listen to, harsh frequencies are likely the reason. These sounds sneak in easily when you’re recording at home.
Simple Fixes You can try While Recording

There are few tricks you must follow to mitigate the issues caused by harsh frequencies of your recording. Follow the following steps:
Step Back from the Mic
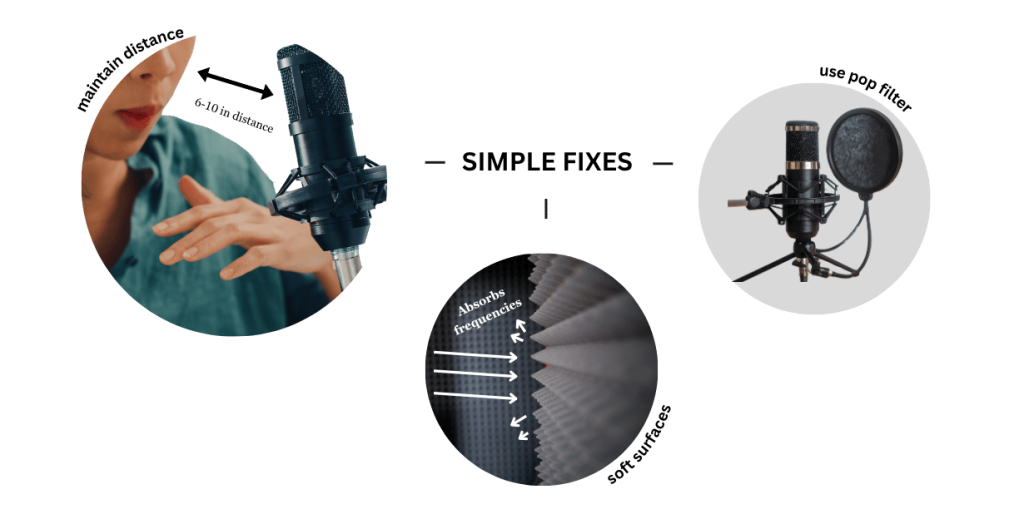
If your voice sounds sharp or too bright, try standing a bit farther from the microphone. Many singers make the mistake of singing too close. This makes high frequencies—like “S” and “T” sounds—hit the mic too hard. It creates a spiky, harsh sound that’s tough to fix later.
Instead, keep about 6 to 10 inches of space between your mouth and the mic. If your mic has a gain knob, lower it slightly so you can sing comfortably without overloading the sound.
Try this: Record one line standing 4 inches away, and then another 8 inches away. You’ll hear the difference right away.
Use a Pop Filter
A pop filter helps soften strong bursts of air that create harsh sound. It’s especially useful for home singers who record in tight spaces. Don’t have a filter? No problem. We have a quick and quirky solution for you. You can stretch a clean sock over a wire hanger or use a foam cover to tame the harsh edges.
This won’t remove harsh frequencies completely, but it keeps the sharpest ones from getting into the recording in the first place.
Pick a Softer Spot in the Room
Rooms with bare walls and floors bounce your voice around. These echoes boost noise frequencies and make your vocals feel cold or metallic.
Instead, record near clothes, curtains, or even a couch. These soft surfaces soak up sharp reflections and give your song recording a smoother, more professional sound.
Listen for the Right Cues
Notice the Sharp Moments
When you play back your vocal, listen closely for words that feel extra sharp or almost “hissy.” These high frequencies usually sounds like “S,” “T,” or “Ch.” If you find yourself wanting to turn down the volume during those parts, that’s a clear sign of harsh frequencies.
Even if your voice is in tune, these tiny sharp moments can distract from the performance. They’re more noticeable on headphones or phone speakers, where the treble stands out even more.
Try This Simple Listening Test
Close your eyes and play your song recording with basic earbuds. Ask yourself: “Does anything poke out too much?” “Do I feel like turning it down?”
You can also play the same line at low volume. If the words still sound sharp or harsh, they likely need softening.
Trust your ears. If something feels off, that’s the cue—no fancy gear or meters required.
Quick Solutions without Getting Technical
Try Free Audio Enhancer tools
If your vocal recording still have that harsh sound, even after adjusting how and where you record, audio enhancer tools can help smooth things out. These tools work online and don’t require you to know anything about EQ, compression, or editing.

One option is Remasterify.com. It’s built for creative artists who want their audio to sound professional without learning all the tech stuff. You simply need to upload your vocal recording (MP3, WAV, or even a video file).
It masters the audio track to industry standards using advanced AI mastering models. Background noise is reduced automatically, and the high frequencies are intelligently balanced. It also adds subtle stereo widening, so your final song recording sounds smooth and full. You don’t need to adjust any dials—unless you want to.
Test Different Takes
Sometimes, the high frequencies or harshness isn’t in the mic or the room—it’s in the way you delivered a certain line. If one take sounds too sharp, try recording it again with a slightly softer tone or a different distance from the mic.
Record two or three versions of the same phrase. One a bit louder, one softer, and one with a calm, steady voice. Then listen back and pick the one that sounds smoothest.
This simple habit helps reduce harsh frequencies naturally—without needing any tools or edits. It’s often the fastest path to a cleaner song recording.
Conclusion
Recording at home doesn’t mean you have to settle for harsh or unpleasant vocals. Once you know what to listen for and how to adjust your space and delivery, you can achieve professional sound without needing technical know-how. The key is to stay aware of how your vocals feel, not just how they sound. If something feels sharp or tiring, small changes can make a big difference. With practice, patience, and a little help from simple tools, your voice can sound clean, smooth, and ready to share. No gear, no stress—just better sound, one take at a time.
