Audio Compression is one of the most powerful tools in music production. It can glue your mix together, control audio dynamics, and make everything sound more polished. But push it too far, and you risk over-compression. It can drain the energy and excitement from your track. In this blog, we’ll break down what it is, how to identify it, and how to properly use.
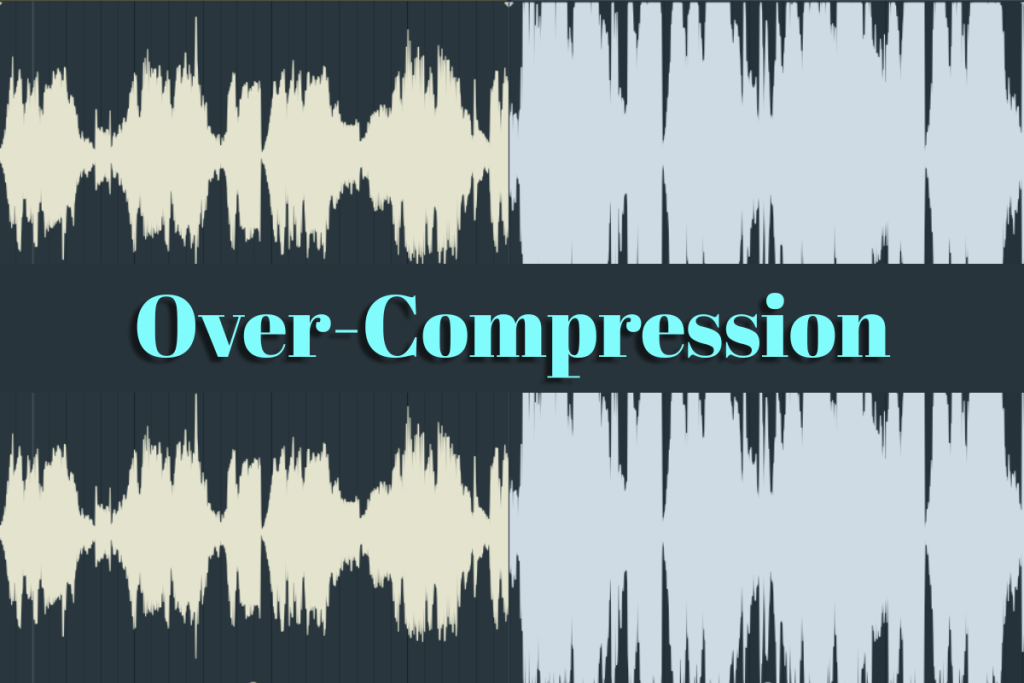
Table of Contents:
How to avoid Over-Compression?
Compression Related Terminologies
Quick Compression Settings Reference
Frequently Asked Questions about Over-Compression
What is compression?

At its core, compression is a tool for controlling the audio dynamics. Its job is to manage volume differences so the quiet parts are easier to hear and the loud parts don’t overwhelm the mix.
A good audio compressor setting can:
- Smooth out irregular volume jumps.
- Bring out subtle details.
- Make your mix more cohesive.
- Shape tone by controlling transients.
What is Over-compression?
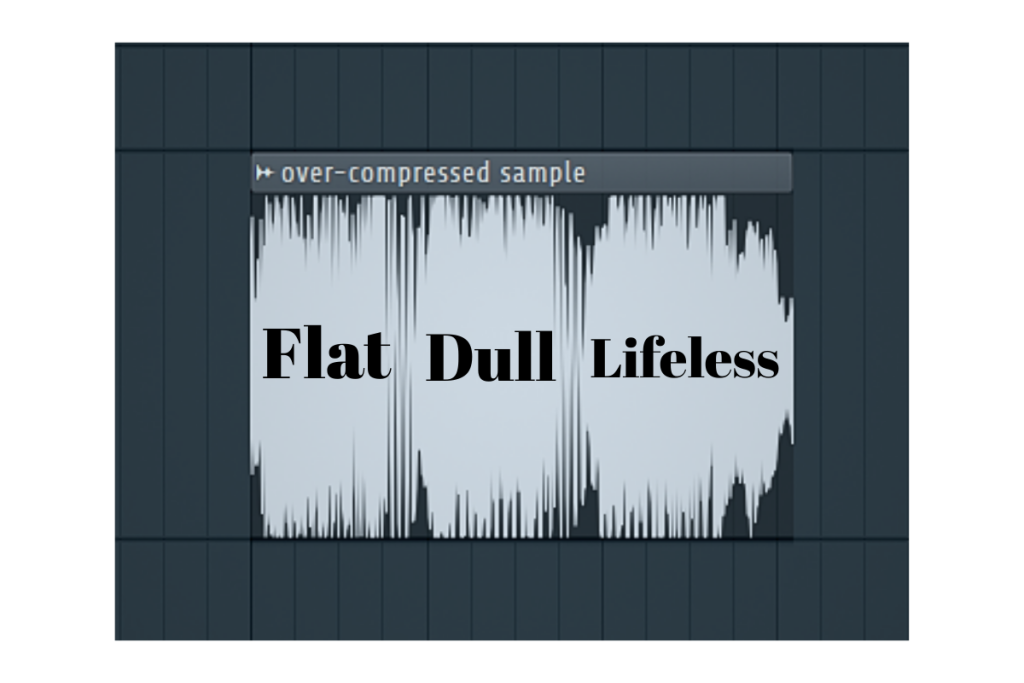
Over-compression happens when you apply too much compression to a track or mix, reducing its natural dynamic range. Instead of letting quiet and loud moments breathe, everything gets squashed into a narrow volume range. Learn to achieve loudness without losing dynamics.
In music, audio dynamics are what make a song feel alive. For example, the soft parts create contrast, and the loud parts bring impact. But when compression is overused, that contrast disappears. The result can be a flat, lifeless sound that feels small, even if it’s technically “loud.”
Identify Over-compression
You can spot over-compression both by ear and by looking at your meters/waveform. Here are the main signs:
Loss of Punch
Considering drums, especially kick and snare, start sounding dull or muted. A snare hit that once popped now blends into the background with no impact. Likewise, percussions don’t stand out when the whole track is over-compressed.
No Dynamic Contrast
Quiet verses and loud choruses feel almost the same in volume. For example, A ballad’s soft intro feels just as loud as the climax. This takes away the liveliness of the whole track.
Audible Pumping or Breathing
The music’s volume swells unnaturally as the audio compressor reacts. For instance, the whole mix dips when a loud kick drum hits, then swells back up.
Waveform Looks Like a Brick
When over-compressed, audio waveforms look like a brick. Contrarily, when a track is compressed at the right settings, it retains its volume differences. Therefore, maintaining the dynamics.
Listener Fatigue
Over-compressed tracks tire the ears quickly. With no dynamic contrast, the sound feels relentless, making listeners want to turn it off sooner than they should.
How to avoid Over-Compression?
Compress with intent
Don’t compress just for the sake of it. For example, if you’re putting an audio compressor over a heavily processed electric guitar, know the reason why the compressor would be helpful.
Subtle compression
Subtle is better than aggressive compression because it controls audio dynamics without flattening them. This keeps transients, punch, and natural movement intact, so the mix stays lively instead of sounding dull or lifeless.
Compare with the reference track.
Matching your mix’s loudness to a pro reference helps reveal if you’ve squashed dynamics. If your mix feels smaller or lifeless at the same volume, you’re likely over-compressing.
Parallel compression

Parallel compression blends a heavily compressed track with its dry version, adding fullness while keeping natural transients intact. It helps avoid over-compression by boosting density without flattening dynamics, making instruments like drums, vocals, and bass sound powerful yet still lively and clear in the mix.
Automate Volume First
Using fader automation to control big level changes means the compressor doesn’t have to work as hard. This prevents unwanted pumping and keeps the sound more natural.
Compression Related Terminologies
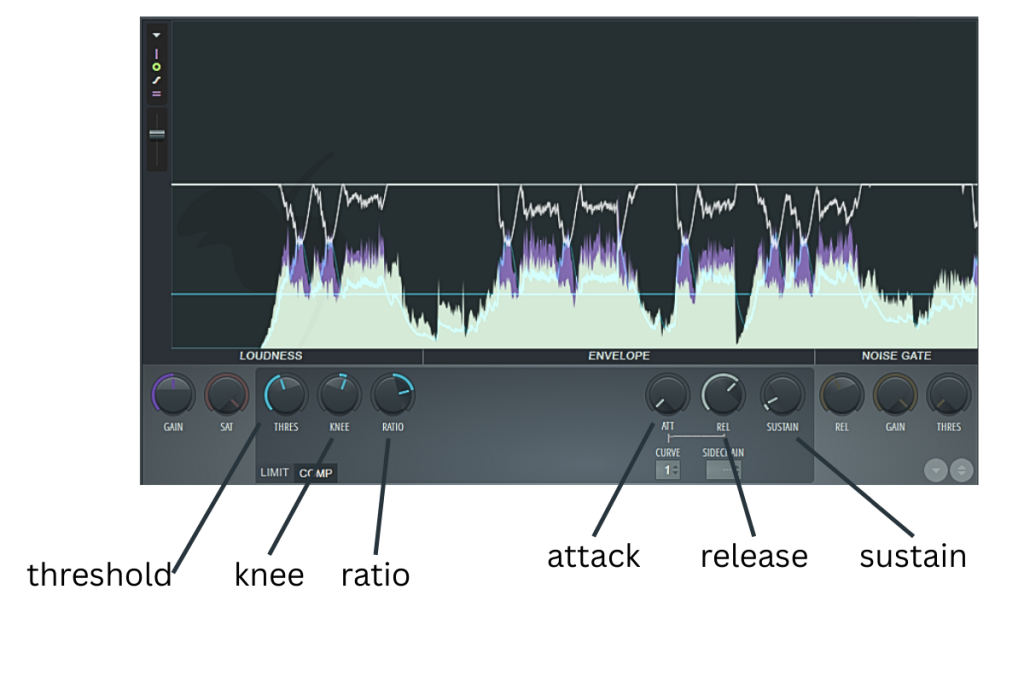
Threshold
The volume level at which the audio compressor starts working.
- If the audio is quieter than the threshold, nothing happens.
- Example: If your threshold is set to -10 dB, only sounds louder than -10 dB (like a loud snare hit) will be compressed.
Knee
How smoothly the compressor starts working once the sound passes the threshold.
- Hard knee: The compressor kicks in suddenly.
- Soft knee: The compressor eases in gradually.
- Example: Soft knee is like gently pressing the brake of a car; hard knee is like slamming it.
Attack
How quickly the audio compressor reacts after the sound passes the threshold.
- Fast attack: Grabs transients quickly (can tame sharp drum hits).
- Slow attack: Lets transients through before compressing (keeps punch).
- Example: Slow attack on a snare keeps its initial “crack” intact.
Ratio
How much the sound is reduced once it’s above the threshold.
- Example: At 4:1, if the input is 4 dB over the threshold, the output will only rise 1 dB.
Release
How quickly the compressor stops working after the sound drops below the threshold.
- Example: Short release makes the compressor let go quickly; long release keeps it compressing longer, which can smooth a vocal or create pumping effects.
Sustain
How long a sound is held after it’s played. It is often a byproduct of compression settings.
- Example: Compressing a guitar with a slower release can make the notes “ring out” longer, increasing sustain.
Quick Compression Settings Reference
Compression settings can vary depending on the style of music and the performance, but these starting points will help you maintain dynamic range while achieving a polished, controlled sound. Use them as guidelines, then fine-tune by ear.
Drums
Using the right audio compressor settings on drums can add punch, control peaks, and keep each hit consistent in level.
- Threshold: Set so only the loudest hits trigger compression (around -6 to -10 dB).
- Ratio: 4:1 for punch, 2:1 for gentler control.
- Attack: Medium (10–30 ms) — lets the initial transient “snap” through.
- Release: Medium-fast (50–150 ms) — recovers before the next hit.
- Knee: Soft for a natural feel.
- Tip to avoid over-compression: If the transient loses its sharpness or the drums feel flat, back off on the threshold or ratio.
Example: For a rock snare, try 4:1 ratio, 20 ms attack, 100 ms release, and aim for 3–5 dB of gain reduction on the loudest hits.
Vocals
Compression on the vocal keeps the vocal present and consistent without making it sound “pinned” in place.
- Threshold: Around -6 to -12 dB (depends on performance).
- Ratio: 2:1–3:1 for transparent control.
- Attack: Medium-fast (5–15 ms) — catches peaks but doesn’t kill articulation.
- Release: Medium (40–120 ms) — allows natural breathing between phrases.
- Knee: Soft for smoother transitions.
- Tip to avoid over-compression: Use volume automation for big level changes before compression so the audio compressor isn’t working too hard.
Example: On a pop vocal, 3:1 ratio, 8 ms attack, 80 ms release, 3–6 dB gain reduction works well for evenness without sounding squashed.
Bass
Purpose: Keep low-end solid and consistent, but preserve note definition.
- Threshold: Around -8 to -12 dB.
- Ratio: 3:1–4:1 for steady control.
- Attack: Medium (20–40 ms) — lets the pluck or pick through.
- Release: Medium-fast (50–120 ms) — avoids pumping in the low end.
- Knee: Soft for smooth compression.
- Tip to avoid over-compression: If your bass loses attack or sounds lifeless, ease up on attack speed or ratio.
Example: On fingerstyle bass, 4:1 ratio, 30 ms attack, 80 ms release, with 4–6 dB gain reduction helps lock it into the mix.
Mix Bus
Purpose: Glue the mix together, not squash it.
- Threshold: Very gentle — just catching the loudest peaks (often around -2 to -4 dB of gain reduction).
- Ratio: 1.5:1–2:1 for subtle glue.
- Attack: Slow (30 ms or more) — lets transients breathe.
- Release: Auto or medium (100–300 ms) for natural recovery.
- Knee: Soft for transparency.
- Tip to avoid over-compression: If your mix feels smaller or loses excitement after engaging the bus compressor, you’re overdoing it—back off.
Example: For a balanced pop mix, 2:1 ratio, 30 ms attack, auto release, and only 1–3 dB gain reduction will add cohesion without choking the audio dynamics.
Frequently Asked Questions about Over-compression
What is the meaning of over-compression?
Over-compression means using so much compression that the natural volume changes (audio dynamics) in music are lost, making the sound flat and lifeless.
What does too much compression do?
Too much compression removes punch, clarity, and natural movement. It can cause ear fatigue and make the track feel smaller, even if it’s loud.
What happens when you over-compress vocals?
Over-compressed vocals can sound dull, lifeless, and unnatural. They might also lose emotional impact and become harder to understand in the mix.
What is the best compression for vocals?
There’s no one “best” setting. It depends on the song and style. A good starting point is a low ratio (2:1–3:1), moderate threshold, slow-to-medium attack, and medium release to keep vocals clear and natural.
Conclusion
Compression is a powerful tool, but like any tool, it works best in balance. Over-compression can strip a track of its energy, clarity, and emotion. By understanding what it is, recognizing the signs, and applying it with intention, you can keep your mixes dynamic and engaging. The goal isn’t just loudness; it’s preserving the life in your music while making it sound polished and professional.