Ever recorded vocals at home and noticed those sharp “S” or piercing “T” sounds cutting through the mix? That’s sibilance. And it matters a lot when posting reels, shorts, or even long-form videos. These harsh frequencies often appear when recording in untreated spaces or using sensitive microphones. That’s where de-essing comes in. It’s a simple fix that smooths out your vocal tone without killing the clarity.
Whether you’re a singer, voiceover artist, or content creator, this guide will show you how to refine your recordings, tame sibilance, and achieve professional-sounding results—even from your home studio.

Table of Contents
5 Easy Things to Do Before You Hit Record
- Position Your Mic Slightly Off-Center
- Use a Pop Filter or Windshield
- Test Different Mic Distances
- Tame Your Room’s Echo
- Warm Up and Pronounce Softly
De-Essing Explained
What Is De-Essing?
De-essing is a simple audio editing process. It reduces sharp “S” and “T” sounds—also known as sibilance. These harsh spikes typically appear in the high frequencies (around 4 kHz to 10 kHz). If left untreated, they can make your vocals sound harsh, distracting, or even painful to listen to.
A de-esser plugin is designed to address this issue. It listens for sibilance and lowers just those sharp peaks. The rest of your vocal stays untouched. It’s a smart way to clean up your recording without losing energy or tone.
What Is Sibilance?
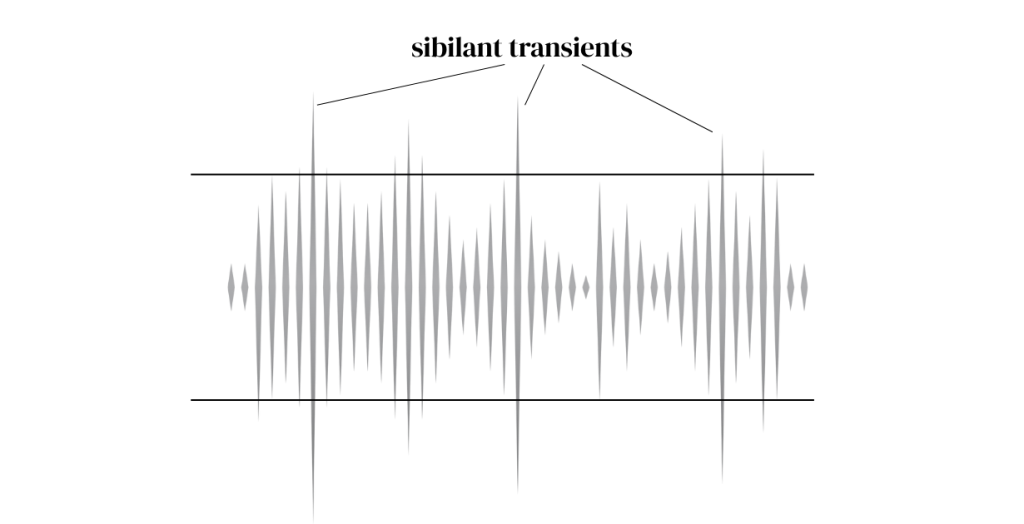
Sibilance is that sharp hiss you hear when someone says “s,” “sh,” or “t.” It’s totally normal when we speak or sing. But microphones pick it up much more aggressively than our ears do in real life.
When your mic captures sibilance, it creates harsh frequencies that spike above the rest of your vocal. This is especially common in digital recordings, where everything is super clear—sometimes too clear.
You might also notice mouth clicks, hiss, or other tiny noises that get recorded. These don’t sound loud at first, but they build up and ruin the mix if you don’t manage them.
Why Harsh “S” and “T” Sounds Occur in Vocals
There are a few reasons sibilance gets worse in home audio recordings:
- Mic placement – A mic pointed straight at your mouth will catch every sharp sound.
- Mic type – Bright condenser mics are common but very sensitive to high-end hiss.
- Untreated rooms – Bare walls bounce back high frequencies, making them more aggressive.
- Close distance – Singing or speaking too close to the mic boosts the sharpest parts of your voice.
Add it all up, and you get a vocal that sounds clear, but painful. That’s why de-essing and basic noise suppression are essential in-home setups. If you also need to remove background noise from audio, you’ll want a tool that handles both at once. Want to record over songs? Read this.
5 Easy Things to Do Before You Hit Record

Fixing sibilance starts before you even press record. These simple steps can reduce harsh “S” and “T” sounds at the source. No plugin needed—just smart setup. Let’s look at the first three.
1. Tame Your Room’s Echo
Your room plays a big role in how your voice sounds on the mic. Hard surfaces like walls, windows, and floors reflect sound. These reflections can make sibilance and other harsh frequencies even sharper.
It’s recommended to use sound absorption panels for best results. But if that feels too costly, there’s a simple workaround. Just hang a thick blanket or comforter behind you. Or try recording in a closet with clothes around you. Soft materials absorb harsh reflections and make your vocal sound smoother.
Reducing room echo also helps with noise suppression later. Less echo means fewer harsh sounds to fix in post.
2. Use a Pop Filter or Windshield
A pop filter is one of the cheapest and most effective tools for reducing sibilance and plosives (like “P” and “B” sounds). It’s a thin mesh screen that sits a few inches in front of your mic.
When air hits the screen, it softens the pressure before it reaches the mic. This helps reduce sharp sounds like “sh” and “sss.” It also keeps moisture from your mouth off your mic, which protects your gear.
If you don’t have a pop filter, a foam windshield can also help.
3. Test Different Mic Distances
The distance between you and the mic affects how well it picks up your voice. Standing too close makes your voice sound boomy, and it boosts sibilance.
Try standing 6 to 10 inches away. Record your vocals for testing and listen back. If you hear harsh “S” sounds, back off a bit or adjust the mic angle again. Each voice is different, so some trial and error is normal.
Distance plus mic angle = your best defense against sibilance.
4. Position Your Mic Slightly Off-Center
Never point the mic directly at your mouth. When you speak or sing straight into the mic, those sharp bursts of air hit the mic capsule full force. This makes sibilance louder and harsher.
Instead, angle the mic slightly to the left or right of your mouth. Keep it level with your nose or mouth, but off to the side. This simple adjustment helps the mic miss the worst of the “S” and “T” blasts.
It still captures your voice clearly, but without the hiss and bite.
5. Warm Up and Pronounce Softly
Believe it or not, part of de-essing starts with your mouth. If you over-enunciate your “S” sounds while speaking or singing, they’ll come out sharper and louder.
Before you record, do a few warm-up takes. Say or sing a few lines gently. Practice delivering your lines or lyrics without forcing the consonants. Soft “S” and “T” sounds are easier to control and process later.
Also, stay hydrated. A dry mouth leads to clicks, hisses, and other unwanted noises. All of that can show up in the recording and be hard to clean.
Next Step: Polish Your Audio
Once you’ve followed the pre-recording steps—mic placement, pop filter, and room treatment—the final touch is mastering your audio. You can do this using Remasterify.

It’s a smart, AI-powered online audio mastering tool. It prepares your audio for online release without changing its natural tone. After recording, simply upload your file and let Remasterify do the cleanup. You can adjust the settings to find what sounds best for your voice or style.
- Mastering Intensity – Adds clarity and loudness without distortion.
- Noise Reduction – Removes background noise from audio like hiss, hum, and clicks.
- Stereo Imaging – Widens your vocals while preserving their natural quality.
- AI Equalization – Automatically adjusts frequencies to tame harsh sounds.
No complex plugin tweaking or DAW needed. Just clean, balanced vocals—ready for YouTube, reels, or streaming.
For singers, voiceover artists, and online creators, de-essing and mastering doesn’t have to be hard. Remasterify makes it simple and effective.
Quick Checklist
Before you hit record, run through this simple checklist to reduce sibilance, avoid harsh frequencies, and get smoother results:
- Angle Your Mic Position it slightly off-center to avoid direct “S” blasts
- Use a Pop Filter – Controls sharp bursts and protects your mic
- Maintain Mic Distance – Stay 6–10 inches away for balanced tone
- Treat Your Room – Use blankets or record in a closet to reduce echoes
- Warm Up Gently – Speak or sing without over-enunciating sharp consonants
- Test and Listen Back – Catch problems before they lock into your take
Combine these steps with light de-essing or use Remasterify to polish it all in one go.
Conclusion
Great audio starts with intention. Even simple adjustments can make your vocals sound smoother, clearer, and more professional. Whether you’re recording music, voiceovers, or content for social media, fixing sibilance and reducing harsh frequencies is key to keeping your listeners engaged. And with tools like Remasterify, you don’t need to be an audio expert to get polished results.
Clean vocals help your message stand out and leave a lasting impression. Focus on clarity, keep things natural, and let smart mastering tools handle the final touch.