Want to make your cover songs sound clean and professional? You don’t need a fancy studio or expensive gear to get started. With a few simple tips, you can improve your recordings and make them stand out online.

This guide will help you set up your space, use your mic the right way, and get better sound from the start. Whether you’re recording for YouTube, Instagram, or just for fun, these steps will take your music to the next level. Let’s break it all down so you can record smarter and sound better—starting today.
Table of Contents
Mic Setup and Technique that Just Work
Export and test on different devices
Give the final touch using Remasterify
Step 1: Prep Your Recording Space (No Studio Needed)
You don’t need a studio to make your cover songs sound good. Just a quiet, soft space can make a big difference.
Choose the Right Room
Avoid large or empty rooms with lots of echo. A closet full of clothes works surprisingly well. Bedrooms with curtains, carpets, or beds also help absorb sound.
Soften the Space
Hang thick blankets behind and around you. Use pillows or couch cushions to block sound reflections. These small changes help you get a clear sound without any extra gear.
Control Background Noise
Turn off anything that hums—fans, laptops, A/Cs. Record during quiet hours like early morning or late night to avoid outside noise.
Why does a well-suited recording space matter?
A quiet space gives you a cleaner vocal recording. That means less editing later and a better chance at achieving a professional sound.
Step 2 – Mic Setup and Technique that Just Work
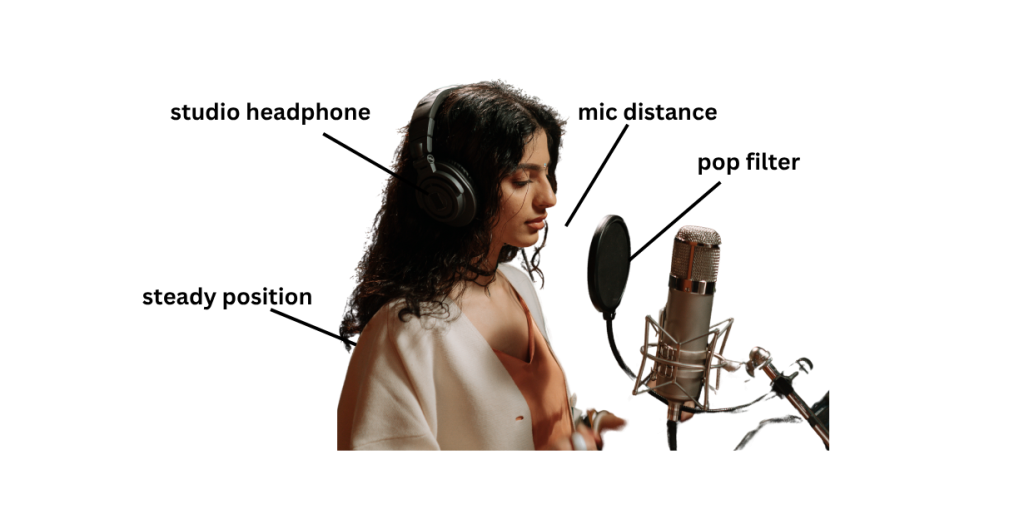
A good mic setup can instantly improve your vocal recording. You don’t need a fancy mic—just use the one you have the right way.
Mic Distance and Position
Keep your mouth about 6–8 inches from the mic. Too close, and you’ll get harsh plosives (strong “P” and “B” sounds). Too far, and your voice will sound weak or distant. Angle the mic slightly off-center to avoid breath hitting it directly.
Use a Pop Filter
A pop filter helps block plosives, providing a smoother sound. Don’t have one? Stretch a clean sock over a wire hanger or use a kitchen strainer as a DIY option.
Stay Still While Recording
Avoid moving around while recording. Shifting side to side can change the sound of your voice. Use a mic stand if possible to keep things stable.
Wear Headphones
Always monitor your audio recording through headphones. This prevents sound from leaking into the mic and helps you hear background issues while recording.
Why does a proper mic setup work well?
Proper mic technique gives you a more professional sound with less effort. Clean input = less cleanup later.
These small tweaks help your cover songs sound clearer, more focused, and easier to edit.
Step 3: Nail the Performance (Before you hit the ‘Record’ button)
No amount of editing can fix a dull or off-pitch performance. The secret to great cover songs is getting the emotion and energy right before you even hit record.
Practice with Intention
Don’t just sing along—study the original. Listen to phrasing, timing, and how the singer delivers each line. Then make it your own. Practice singing sections slowly to build control.
Break It into Sections
Record your song part by part—verse, chorus, bridge. This keeps your energy fresh and helps avoid vocal fatigue. Shorter takes are easier to perfect and edit.
Stand Up to Sing
Good posture supports breath control and tone. Standing opens up your chest and improves airflow, leading to a stronger, more stable voice.
Do a mic check before the real take
Before recording, do a mic check—listen for hums or clicks. Eliminate any background noise. Wear headphones to monitor your voice in real time. This helps prevent audio bleed and allows you to identify issues early.
Don’t over-record
Record 2–3 focused takes per section. Too many attempts lead to vocal fatigue and weaker results. Fewer takes with energy lead to a more professional sound.
Step 4: Layer it Right (Doubles, Harmonies, and Panning)
Start with the Lead Vocal
Record one clean, expressive take as your main vocal. This should carry the emotion and clarity of the performance.
Add a Vocal Double
Sing the same melody again in a second take. Keep it tightly aligned with your lead. This adds depth and makes your audio recording sound fuller.
Use Soft Harmonies for Texture
Record a simple harmony—either above or below your melody. Keep it subtle and place it a bit lower in volume than the lead. Harmonies should support, not steal focus.
Pan for Width
Pan the double slightly left and the harmony slightly right (10–20%). This opens up the mix and creates a wider, more professional sound.
Keep It Simple
Don’t overdo the layers. Two or three tracks are enough to enhance your cover songs without making them sound crowded.
Smart layering gives your mix polish and space, perfect for standing out on any platform.
Step 5: Export and test on different devices
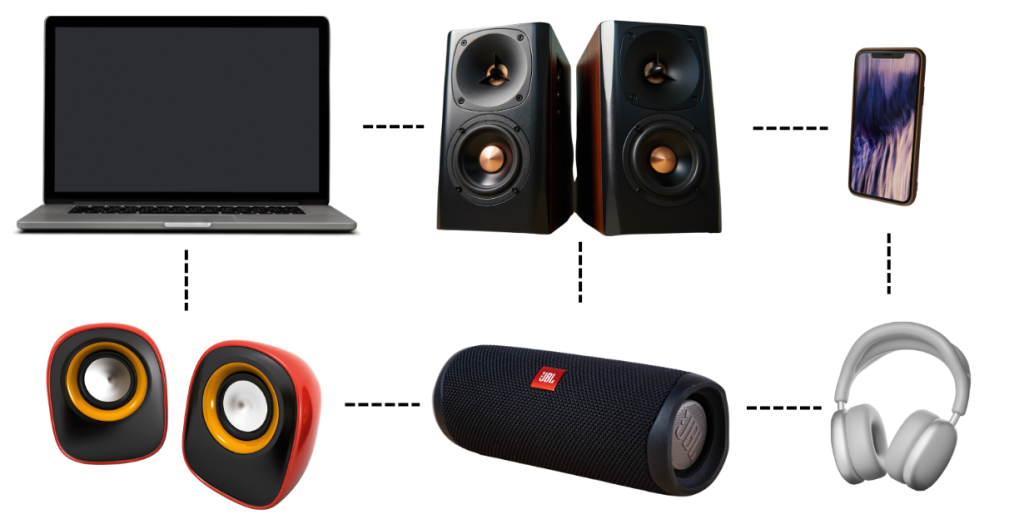
Once your audio recording sounds good in your headphones, don’t stop there. Export your final track as a high-quality WAV or 320 kbps MP3 file.
Then, play it on different devices—your phone, laptop speakers, and even a car stereo if possible. This helps you catch issues you might’ve missed, like vocals sounding too sharp or too quiet.
A great cover song should sound clear and balanced everywhere. Mastering your mix ensures it translates well on all platforms, giving it a more professional sound and making your vocals stand out in any setting.
Step 6: Give the final touch using Remasterify

Mastering is the last step after recording, layering, and adjusting your vocals. This is where you polish your track to make it stand out across all playback systems.
- Remasterify helps you do this without needing deep audio knowledge. It can smooth out volume differences and enhance clarity. And even removing background noise.
- It’s especially useful when you’re aiming for a more professional sound but don’t have access to high-end tools or plugins. Just upload your finished mix, and Remasterify processes it to bring out a clearer, more even result.
Think of it as the finishing touch that ties your audio recording together. You’ve already done the hard work—this just helps your performance come through the way you intended.
Conclusion
Recording great cover songs doesn’t require expensive gear or a pro studio. With the right setup, smart mic technique, and a bit of vocal prep, you can create a clean, expressive audio recording from home. Start simple—practice, record in sections, and layer with care.
Test your mix on different devices to make sure it sounds balanced. And when you’re ready, use tools like Remasterify to give your track that final polish. Every recording is a step forward. Stay consistent, keep learning, and your vocal recordings will only get better with time.