You have probably spent hours to mix a track, and later found its sound flat or awkward on other speakers, or headphone? You may experience some harsh highs, muddy lows, even no punch! And yes, that’s frustrating, not to mention.
But there’s no fault of yours… you know that? Exactly. That may be the mastering chain. You have to understand that mastering is not just making a louder. It’s about making sure that your track translates rightly on any device – be it a phone, club speakers, or even earbuds.
But the toughest part is that: even small mistakes in your mastering order can mess up the sound. Too much compression? You lose impact. Bad EQ placement? Clarity disappears. Add distortion in the wrong spot? Now it’s just harsh noise.
Ever finished mixing a track only to find it sounds dull, unbalanced, or weak on different speakers? A poor mastering chain can flatten your sound, making it muddy, harsh, or lifeless. Without the right steps, even a great mix can fail to impress.
If this case sounds familiar, don’t worry. You’re not alone in this pothole. In this guide, I’ll walk you through:

Table of Contents
- What is a Mastering Chain?
- Why the Order of a Mastering Chain Matters?
- Step by Step Mastering Chain
- Common Mistakes to Avoid in Mastering Chains
- Final Thoughts
- Frequently Asked Questions
What is a Mastering Chain?
A Mastering chain is a set of processing steps used to prepare a final mix for release. It makes a song clear, balanced, and loud, so it sounds great on any speaker—from studio monitors to phone speakers.
Each step has a purpose. EQ shapes the tone, compression controls dynamics, harmonic distortion adds warmth, and limiting boosts loudness. When used correctly, these tools enhance the mix without losing its natural feel. A good mastering chain makes a song ready for streaming, radio, and live playback, helping it stand out without distortion or imbalance.
Why the Order of a Mastering Chain Matters?
The order of processing is highly important. If the steps are in the wrong order, they can cause distortion, imbalance, or unwanted effects.
For example:
- EQ before compression removes unwanted frequencies so they don’t affect volume control.
- Saturation before limiting adds warmth without causing clipping.
- Stereo imaging after EQ ensures a wide sound without phase problems.
Each step builds on the last. If you compress before EQ, you may boost the wrong sounds later. If you limit too early, it reduces your ability to shape the track.
A right mastering effects helps make a mix clear, warm, and punchy. By following the right mastering order, you get consistent, professional results every time.
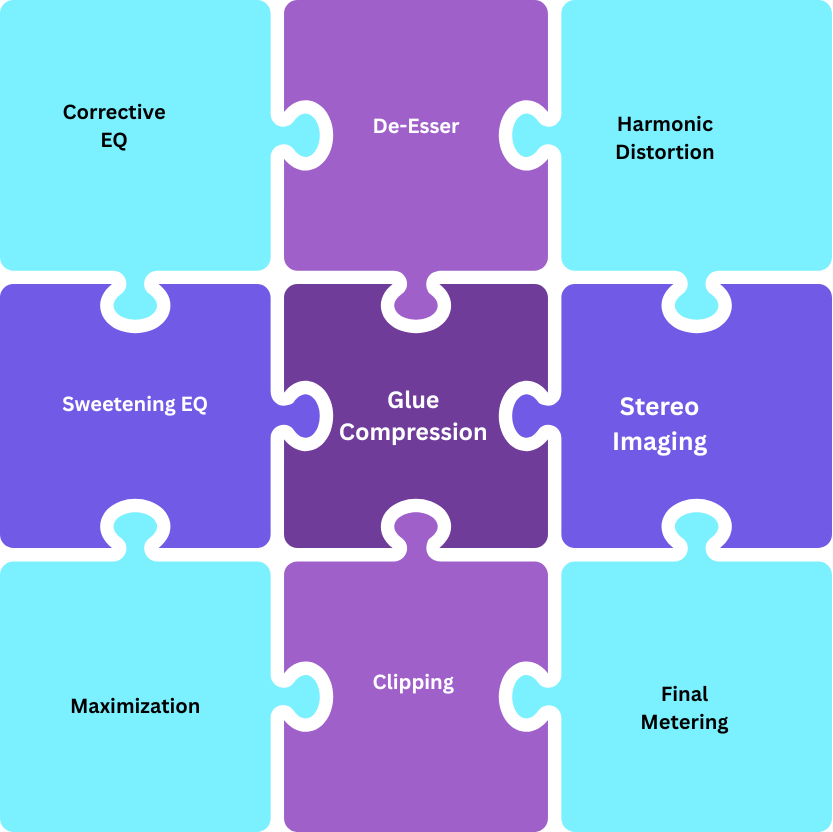
Step by Step Mastering Chain
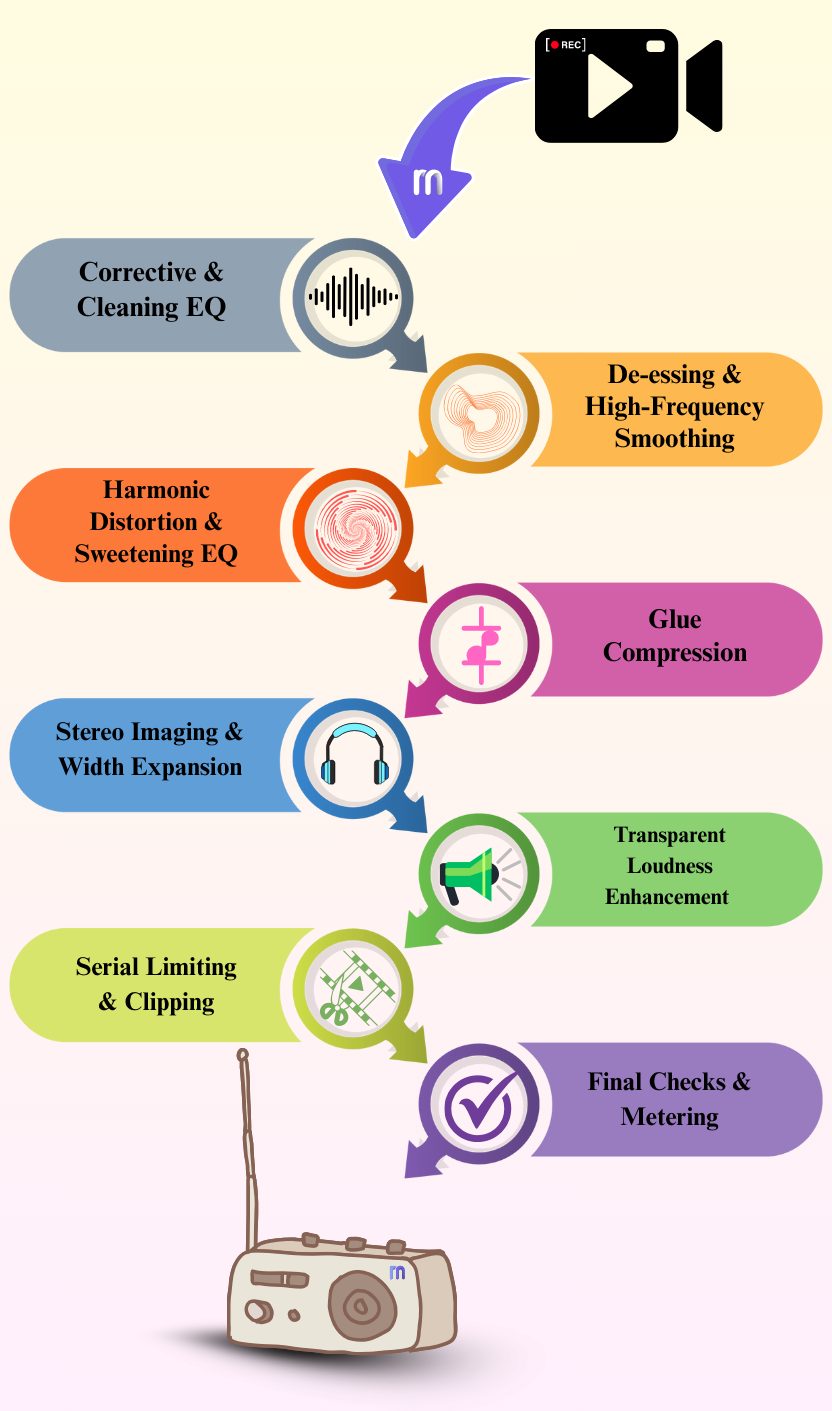
A good chain is important for getting the best mastering chain and a professional sound. Each step, like EQ, compression, and limiting, helps shape the mix. Using mastering effects in the right order improves clarity, balance, and loudness. This makes sure your track sounds great on any speaker. Below are the key steps in a strong mastering chain.
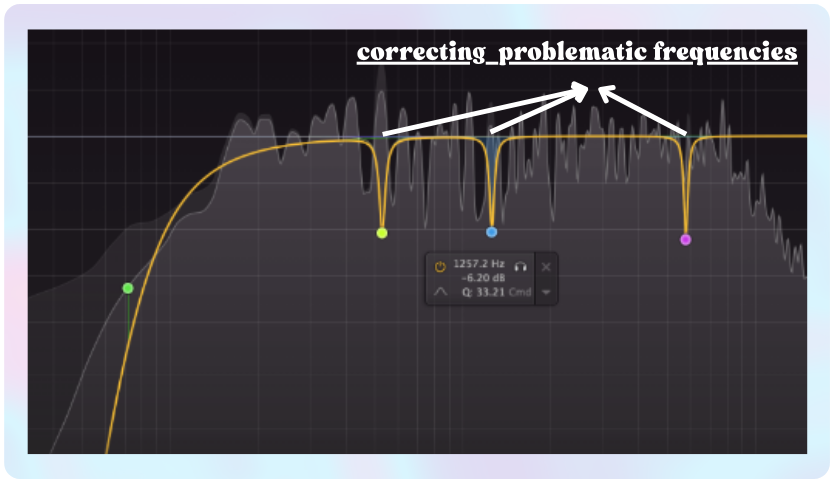
Step 1: Corrective & Cleaning EQ
The first step in a mastering chain is corrective EQ. This removes unwanted frequencies, making the mix cleaner and more balanced before further processing.
Why It’s Important?
Every mix has problem frequencies—low-end rumble, harsh highs, or muddy mids. If left untreated, these can affect compression, saturation, and limiting later in the chain. A clean EQ pass prevents these issues.
How to Apply It
- High-Pass Filtering: Cut unnecessary low-end below 20-30 Hz to remove sub-bass rumble.
- Mid-Side EQ: Remove bass from the stereo field while keeping it strong in the center.
- Harshness Control: Use narrow cuts (not boosts) to tame sharp highs and boxy mids.
- Dynamic EQ for Problematic Resonances: Reduce frequencies only when they become too loud rather than applying constant cuts.
Best Practices
- Use gentle cuts (1-3 dB) to maintain a natural sound.
- Don’t overdo EQ—too many cuts can flatten the mix.
- Always listen in context—make small changes and A/B test.
Recommended Plugins:
By starting with corrective EQ, you ensure the mix is ready for compression, harmonic distortion, and loudness processing in the next steps.
Step 2: De-essing & High-Frequency Smoothing
After corrective EQ, the next step in an audio mastering chain is de-essing. This reduces harsh “S” and “T” sounds in vocals and smooths out sharp cymbals and hi-hats. If left untreated, these high frequencies can sound even harsher after compression and limiting.
Why It’s Important
Harsh high frequencies can make a song unpleasant to hear. Too much sharpness in vocals or cymbals can cause ear fatigue. De-essing softens these harsh tones while keeping the track clear and natural.
How to Apply It
- Use a De-Esser Plugin: Focus on frequencies between 3 kHz and 8 kHz where harshness often occurs.
- Adjust Carefully: Reduce sharp sounds without making vocals sound dull.
- Use Split-Band Mode: Only process harsh highs instead of the whole mix.
- Try Dynamic EQ: Target sharp tones only when they get too loud.
Best Practices
- Be subtle—too much de-essing can make a track sound flat.
- A/B test often to keep the sound natural.
Recommended Plugins:
This step ensures harmonic distortion and limiting later in the chain work without making high frequencies too sharp.
Step 3: Harmonic Distortion & Sweetening EQ
After de-essing, the next step in the mastering chain is harmonic distortion and sweetening EQ. This step adds warmth, depth, and character to a track, making it sound fuller and more natural.
Why It’s Important
A mix without harmonic distortion can sound too clean or dull. Adding gentle saturation creates musical harmonics, making the track richer and more alive. Sweetening EQ helps by boosting key frequencies, improving clarity and balance.
How to Apply It
- Use Tape or Tube Saturation: Plugins like Softube Tape or Blackbox HG2 add warm harmonics without distorting.
- Apply to Low-Mids for Warmth: Light saturation between 100 Hz – 500 Hz makes the mix fuller.
- Boost Highs and Lows with EQ: A small high-shelf boost (10 kHz – 16 kHz) adds air, while a low-end boost (30 Hz – 100 Hz) enhances depth.
- Avoid Too Much Saturation: Too much harmonic distortion can make a track harsh or muddy.
Best Practices
- Use gentle saturation to keep the mix clear.
- Make small EQ boosts to avoid sharpness.
- A/B test to keep the natural tone intact.
Recommended Plugins:
This step enhances the mix’s sound, preparing it for compression and stereo imaging in the next stages.
Step 4: Glue Compression
After harmonic distortion and sweetening EQ, the next step in the mastering order is glue compression. This helps blend all elements together, making the track sound smooth and polished.
Why It’s Important
A mix without glue compression may sound disconnected, with instruments and vocals feeling separate instead of unified. Compression smooths out volume differences and adds punch without making the track lifeless.
How to Apply It
- Use a Bus Compressor: Plugins like SSL G-Master Bus Compressor or Townhouse Bus Compressor create a balanced, glued-together mix.
- Set a Slow Attack & Medium Release: This preserves transients while keeping the sound controlled.
- Use Light Compression (1-2 dB Gain Reduction): Too much compression can kill dynamics and make the track sound flat.
- Make Subtle Adjustments: Lower the threshold until the mix sounds tighter, but avoid over-compression.
Best Practices
- Keep compression light to maintain natural dynamics.
- Use parallel compression if you need more punch without squashing transients.
- Always A/B test to ensure the mix stays lively and open.
Recommended Plugins:
Glue compression makes everything feel connected and balanced, preparing the track for stereo imaging and limiting in the next steps.
Step 5: Stereo Imaging & Width Expansion
After glue compression, the next step in the mastering chain is stereo imaging. This helps widen the mix while keeping the center strong. A well-balanced stereo image makes a track sound fuller and more immersive.
Why It’s Important
A mix that is too narrow can sound flat and lifeless. But if it is too wide, it may cause phase issues, making it weak in mono playback. Stereo imaging ensures clarity and depth without losing impact.
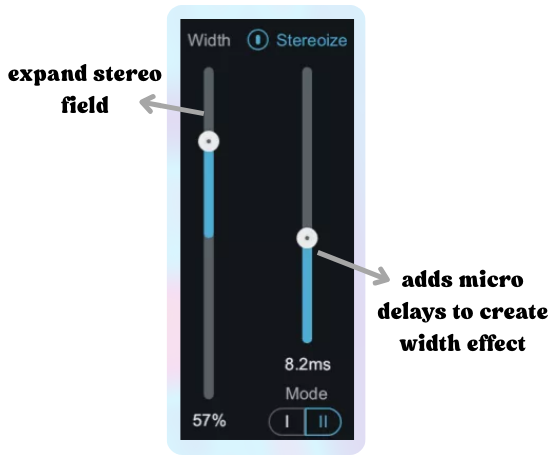
How to Apply It
- Use a Stereo Imager Plugin: Plugins like Ozone Imager help adjust width without causing phase problems.
- Widen Only High Frequencies: Expanding frequencies above 3 kHz keeps the bass tight in the center.
- Keep Low Frequencies in Mono: Make sure everything below 150 Hz stays in the middle for a solid mix.
- Use Mid-Side EQ: Add a slight boost to the sides in the highs for extra space.
Best Practices
- Avoid extreme widening—it can weaken the mix.
- Always check mono compatibility to prevent sound loss.
- Keep vocals and bass centered to maintain focus.
Recommended Plugins:
A good stereo image makes the mix sound bigger and more exciting, preparing it for maximization and limiting in the final steps.
Step 6: Maximization and Transparent Loudness Enhancement
After stereo imaging, the next step in the mastering effects is maximization. This makes the track louder while keeping it clear and natural. A well-maximized track sounds powerful but not distorted.
Why It’s Important
Loudness helps a song stand out on streaming platforms, radio, and live shows. If a track is too quiet, it may sound weak. If it’s too loud, it can become harsh and messy. Maximization helps the track stay strong and balanced.
How to Apply It
- Use a Maximizer Plugin: Tools like Oxford Inflator or FabFilter Pro-L2 increase volume without losing quality.
- Control Peaks First: Use light compression before maximizing to avoid sudden jumps in volume.
- Boost Loudness Slowly: Increase gain step by step until the track is loud but still clean.
- Check LUFS Levels: Keep loudness between -8 and -14 LUFS, based on the platform.
Best Practices
- Don’t push too hard—too much maximization kills dynamics.
- Compare with reference tracks to match professional sound.
- Keep bass strong and highs clear while boosting loudness.
Recommended Plugins:
Maximization makes the track bold and competitive, preparing it for final limiting in the last step.
Step 7: Serial Limiting & Clipping
After maximization, the final step in the mastering chain is limiting and clipping. This controls peaks and ensures the track stays loud but clean. A good limiter prevents distortion while keeping the mix punchy and dynamic.
Why It’s Important
Without limiting, sudden volume spikes can cause distortion. If pushed too hard, the limiter can crush transients, making the track sound flat. The goal is to increase loudness while keeping clarity.
How to Apply It
- Use Two Limiters (Serial Limiting): First, apply a soft limiter to reduce peaks. Then, use a final limiter to reach the target loudness.
- Apply Clipping Before Limiting: Light clipping removes harsh peaks before limiting.
- Set Output Ceiling: Keep it at -1 dBTP to prevent clipping on streaming platforms.
- Check LUFS and True Peak: Aim for -8 to -12 LUFS, depending on the platform.
Best Practices
- Use gentle limiting to keep transients intact.
- A/B test to ensure clarity and punch remain.
- Avoid over-limiting, which can make the mix sound lifeless.
Recommended Plugins:
Proper limiting ensures that your track is loud, clear, and distortion-free, making it ready for release.
Step 8: Final Checks & Metering
After limiting, the last step in the mastering order is final checks and metering. This ensures the track meets industry standards and sounds great on all systems.
Why It’s Important
A mix may sound good in the studio but different on other speakers. Poor metering can lead to a master that is too quiet, too loud, or unbalanced. Checking metering and playback helps avoid these issues.
How to Apply It
- Use LUFS Metering: Keep loudness between -8 and -14 LUFS, depending on streaming platform limits.
- Check True Peak: Set the limiter’s ceiling to -1 dBTP to avoid clipping on digital platforms.
- Compare with Reference Tracks: Match the loudness and tonal balance of similar professional songs.
- Test on Different Speakers: Play the track on studio monitors, headphones, phone speakers, and car audio to ensure consistency.
- Check Mono Compatibility: Some stereo effects disappear in mono playback. Always test to prevent phase issues.
Best Practices
- Keep an eye on meters that provide visual data to meet platform requirements.
- Avoid over-processing—if the mix sounds good, don’t over-fix it.
- Always A/B test before finalizing the master.
Recommended Plugins:
This final step ensures your track is polished, professional, and ready for release.
Common Mistakes to Avoid in Mastering Chains
Even with a solid chain, it’s easy to go off track. One small mistake—and boom—your mix ends up harsh, squashed, or hollow. Let’s keep things real simple and go over a few mastering missteps you’ll want to dodge.
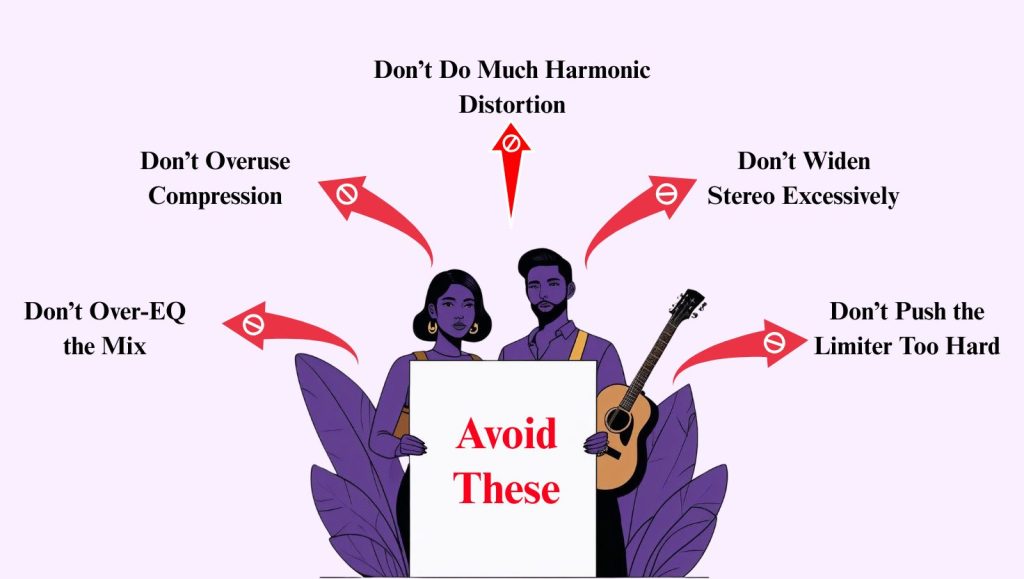
1. Over-EQing the Mix
What goes wrong?
It’s tempting to keep tweaking the EQ until everything feels “just right.” But overdoing it, especially with big cuts or boosts, can suck the life out of your mix. Keep it minimal. A couple dB here and there is often enough. If you find yourself EQing endlessly, it might not be the EQ that’s the problem.
How to fix it?
- Make small EQ adjustments—cutting or boosting no more than 3 dB unless necessary.
- A/B test changes frequently to ensure a natural tone.
- Use EQ for corrective tweaks, not to reshape the entire mix.
2. Overusing Compression
What goes wrong?
Compression is meant to glue your mix together, not flatten it like a pancake. If your drums feel soft or vocals lack energy, chances are you’re hitting it too hard. Light compression with slow attack and gentle release goes a long way. Let the track breathe.
How to fix it?
- Apply light compression (1-2 dB gain reduction) to maintain dynamics.
- Use parallel compression for more control without over-squashing.
- Set a slow attack and medium release to keep the mix punchy yet controlled.
3. Too Much Harmonic Distortion
What goes wrong?
A little warmth can do wonders. But crank up the harmonic distortion too much, and things start sounding muddy or harsh. Add gentle saturation in the low-mids, and always A/B test to keep things musical, not messy.
How to fix it?
- Add subtle saturation to the low-mids (100 Hz – 500 Hz) to enhance warmth.
- Apply tape saturation or tube distortion only where needed (e.g., bass, vocals).
- Always A/B test to avoid excessive harshness.
4. Excessive Stereo Widening
What goes wrong?
Everyone loves a wide mix. But push stereo widening too far, and you risk phase issues. What sounds massive in stereo might collapse in mono. Keep the bass and vocals centered, and widen only the highs if needed. Less is more here.
How to fix it?
- Widen only high frequencies (above 3 kHz) while keeping bass and vocals centered.
- Always check mono compatibility to prevent loss of sound.
- Use stereo widening tools sparingly—a little goes a long way.5. Pushing the Limiter Too Hard
5. Pushing the Limiter Too Hard
What goes wrong?
We get it. You want your track to hit hard. But if you’re pushing the limiter to the edge, you’re probably crushing all your dynamics. Try serial limiting in small steps and keep your true peak under -1 dBTP. Loud is good, clean and loud is better.
How to fix it?
- Use serial limiting (two limiters in small steps) instead of one aggressive limiter.
- Set true peak to -1 dBTP to prevent digital clipping on streaming platforms.
- Keep LUFS levels between -8 and -14, depending on the platform.
Final Thoughts
Mastering makes a track clear, balanced, and professional. A good audio mastering chain keeps the sound natural and powerful while making sure it works well on all platforms.
But mastering can be tricky. Many producers struggle with too much processing, weak volume, or phase issues. Even after following the right mastering order, a mix might still lack clarity or impact. Fixing this takes time and can feel frustrating.
This is where Remasterify helps. Instead of spending hours adjusting settings, it automates key mastering steps while keeping your track’s energy and character. It helps with mastering effects like EQ, compression, and loudness, making sure your music is ready for streaming, fast and easy.
Mastering should improve your music, not make things harder. Whether you do it yourself or use smart tools like Remasterify, the goal is the same, a strong, clear, and professional sound.
Frequently Asked Questions
1. What is the best mastering chain order?
A typical mastering chain starts with corrective EQ, followed by de-essing, harmonic enhancement, compression, stereo imaging, maximization, limiting, and final metering. The order matters because each step builds on the previous one.
Don’t want to set it up manually? Remasterify automates this full chain while keeping your mix’s character intact.
2. How do I avoid over-compression in mastering?
Use light gain reduction (1–2 dB), set a slow attack to preserve transients, and always A/B test with the uncompressed version. Parallel compression can also help retain punch.
Remasterify applies balanced compression settings, so your track stays clean and dynamic. You don’t need guesswork here.
3. Should EQ come before or after compression in mastering?
Corrective EQ usually comes before compression to clean up unwanted frequencies. Sweetening EQ can be used after compression to shape the tone.
Remasterify follows this best practice to ensure clarity and tonal balance in your final master.
4. How loud should my master be for streaming platforms?
Aim for loudness levels between -8 and -14 LUFS, depending on the platform. Also keep your true peak below -1 dBTP to avoid clipping.
Remasterify automatically matches platform standards, so you don’t have to worry about loud penalties.
5. Can I master a song without expensive plugins?
Yes, but it requires experience and careful use of built-in tools. Still, getting pro results can be tricky without proper monitoring and meters.
Remasterify gives you studio-grade mastering in seconds. Yes, with no plugins or setup.