Think of this situation. You hit record. The performance feels good, the energy is there, and everything sounds powerful in the moment. But when you play it back, something feels off. Parts of the audio are rough, scratchy, or even painful to listen to. That’s because you’ve likely run into a very common problem: clipped audio.
Clipping happens to almost everyone at some point. Musicians, podcasters, even casual voice recorders can face this. It sneaks in when the signal gets too loud for your system to handle. Many people, when faced with this issue, reach for a quick fix: normalizing the audio. The idea sounds reasonable: just even out the volume so nothing’s too loud or too quiet.

But here’s the truth: if your track is already clipped, normalization won’t solve the problem. It doesn’t repair what’s broken; it can actually make things worse. To understand why, let’s first look at what clipping really is.
Table of contents:
What Happens When You Normalize Clipped Audio?
Best Practices for Healthy Audio Levels
What Is Audio Clipping?
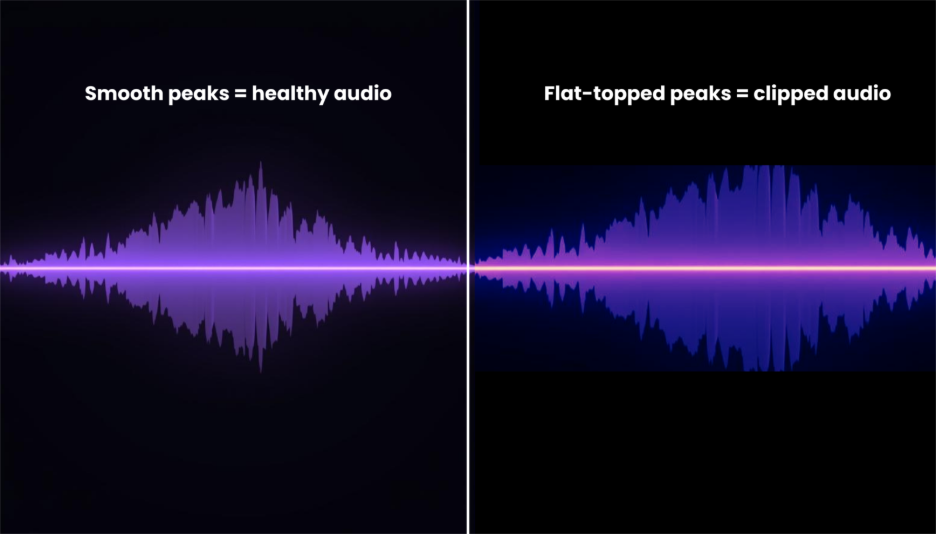
Clipping occurs when your audio signal is louder than your system can handle. Digital audio has a ceiling — 0 dBFS (decibels full scale). Once your recording hits this ceiling, it can’t go higher. Instead of capturing the natural peaks of your voice or instrument, the system slices them flat.
Think of it like pouring water into a glass that’s already full. Any extra water doesn’t fit inside; quite naturally, it spills over.

In audio, the “spill” shows up as a flattened, distorted waveform. Instead of smooth curves, you get sharp, squared-off edges.
How Clipping Happens During Recording or Mixing
Clipping can creep in at different points:
During recording:
- The mic input is set too high.
- The performer suddenly sings, shouts, or plays louder than expected.
- Spikes like a laugh, drum hit, or guitar strum push the signal past safe levels.
During mixing:
- Multiple tracks are stacked together, and their combined volume crosses the ceiling.
- Effects like EQ or compression boost certain frequencies without enough headroom.
| Stage | Example of Clipping | What to Watch Out For |
| Recording | Singer leans in and shouts into the mic | Always check input gain |
| Mixing | Several tracks together make the master red | Leave –6 to –3 dB headroom |
What Are the Audible Signs of Clipped Audio
Even without meters, your ears can often catch clipping. Some signs include:
- Vocals that sound gritty, harsh, or “crunchy.”
- Instruments that lose their natural tone or warmth.
- Sudden moments where the sound feels broken or uncomfortable.
- Loud passages that cause ear fatigue quickly.
A simple test is to play your track on different speakers or headphones. If it consistently sounds rough at the loudest parts, chances are it’s clipped.
What Happens When You Normalize Clipped Audio?
At first, normalizing seems like a smart fix. You lower or raise the track so it sits at an even loudness. But if the audio is already clipped, this step doesn’t repair the damage. Instead, it often makes the flaws more noticeable. Here’s why:
Normalization doesn’t fix distortion
When peaks are chopped off during clipping, the waveform loses its natural shape. Normalizing simply makes the entire track louder or softer. It doesn’t restore what was cut away. The distorted sections remain broken, only now sitting more clearly in the mix.
Risks of boosting already damaged signals
If the clipped parts were already harsh, normalization can push them forward. This means the very sections you wanted to hide or soften end up becoming more obvious, like turning up the volume on a bad recording.
How it affects loudness and quality
A normalized track may look fine on meters, but it often sounds worse to the ear. The smooth balance you expect is replaced with an unnatural edge, because the distortion gets “leveled” along with everything else.
Permanent distortion and loss of detail
Once audio is clipped, the fine details at the peaks are gone forever. No amount of level adjustment can bring back the lost harmonics or subtle tones. Normalization only spreads the damaged signal evenly across the track.
Listener fatigue from harsh peaks
Clipped sounds are sharp and fatiguing, especially when brought to an equal loudness. Listeners may not always know why it feels unpleasant, but over time, the ear grows tired of the harshness.
Reduced dynamic range in the final mix
Normalization often gives the illusion of balance, but it flattens the natural rise and fall of music or speech. Instead of energy and movement, the track feels squashed, making it less engaging to listen to.
Why normalization hides the real problem
The track may look “fixed” on a waveform display because the levels are consistent. But the underlying distortion remains. Normalization covers the symptom without addressing the cause, leaving you with a track that sounds polished on the surface but broken underneath.
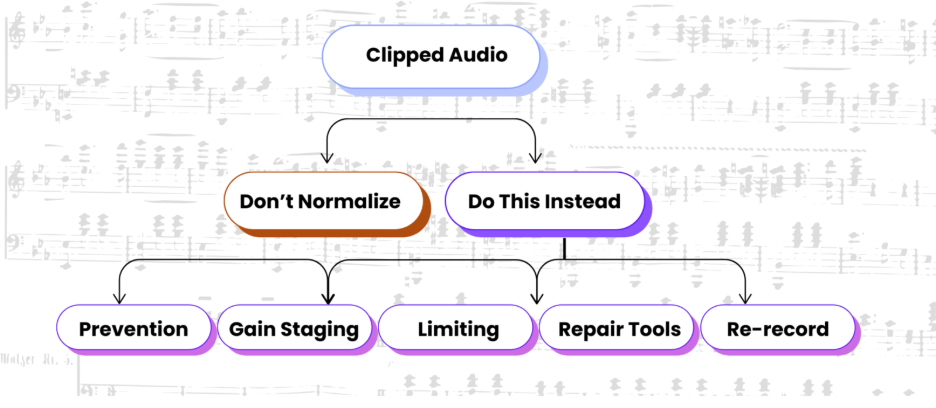
What You Should Do Instead…
If normalization isn’t the answer, what should you do when dealing with clipped audio? The good news is that there are safer, more reliable ways to handle it. Here are the main approaches:
Prevent clipping at the recording stage
The best solution is to stop clipping before it happens. Always check your input gain before hitting record. Keep an eye on your meters and leave space (called headroom) so sudden peaks don’t push the signal into distortion. A safe rule is: if it looks like it’s about to hit the red, turn it down.
Use proper gain staging before mixing
Gain staging means balancing the volume of each track so they play nicely together. If one track is much louder than others, it can overload the mix. By adjusting levels step by step, you avoid unwanted clipping later. Think of it like cooking, don’t dump all the salt in at once, add it gradually so the dish tastes balanced.
Apply limiting instead of normalization
A limiter is a tool designed to stop peaks from going past a set ceiling. Unlike normalization, it actively prevents distortion by gently controlling the loudest parts of your audio. This keeps your track powerful but safe. It’s like having a bouncer at the door who won’t let things get out of control.
Repair clipped audio with restoration tools
Sometimes you can’t re-record. In that case, specialized audio software can help repair clipped waveforms by rebuilding some of the lost peaks. These tools aren’t magic, but they can make the distortion less obvious.
Consider re-recording when distortion is severe
If the clipping is heavy and the performance is important; the best option is often to re-record. It saves time and energy compared to struggling with damaged audio. Professionals re-record all the time, it’s not a failure, it’s part of getting a clean result.
Best Practices for Healthy Audio Levels
Avoiding clipping is about working with safe levels from the very beginning. A few simple practices can make a huge difference in keeping your audio clean and professional:
- Keep peaks below 0 dBFS
Digital audio systems can’t handle anything above this ceiling. Aiming for peaks at –3 dB gives you breathing room. It’s like driving; you don’t keep your speedometer to the exact limit; you leave a buffer to stay safe.
- Aim for safe recording levels (–6 dB to –3 dB)
Recording a little lower is better than recording too hot. You can always turn the volume up later, but once clipping happens, you can’t undo it. This range is the sweet spot for both music and voice.
- Use LUFS and true peak meters for consistency
LUFS (Loudness Units Full Scale) tells you how loud your track feels to the listener, while true peak meters show the highest momentary spikes. Together, they help keep your recording both consistent and distortion-free. Many free plugins like Youlean Loudness Meter can show these meters, making it easy to check. Read More.
Click to learn how to prep your track in the mix for a better master.
Conclusion
Clipping is one of the easiest mistakes to make in audio, and normalization often feels like the easiest fix. But the reality is clear: normalization ≠ repair. Once your audio is clipped, the distortion is baked in, and making everything louder or softer won’t bring the lost details back.
Instead, focus on prevention and smart practices. Keep your levels safe, use limiters when needed, and don’t hesitate to re-record if something goes wrong. With these approaches, you’ll get cleaner, more reliable audio that listeners actually enjoy.