Do you feel like your music almost sounds pro… but not quite there? You’re not alone. Even the best mixes need a final polish. And that’s where a mastering assistant like Remasterify shines. Think of it as your 24/7 audio expert, tweaking your tracks to radio-ready quality in minutes.
But here’s the best part: This isn’t some robotic preset machine. Remasterify’s AI listens to your music and then lets you guide it. Love punchy lows? Wider vocals? It adapts. Whether you’re a producer or a podcaster, this guide will show you how to personalize AI mastering. That too without much technicalities.
Ready to make your music sound like you, just louder and prouder? Let’s dive in.
Table of Contents:
The Science behind Remasterify’s AI
Start With a Reference Track: Your Shortcut
Control the Mastering Intensity
Stereo Widening: From Intimate to Immersive in a click
Tweak the AI equalizer: Smart controls VS Full custom control
Why Remasterify is Your Ultimate Mastering Assistant
The Science behind Remasterify’s AI

1. Your Track Gets a “Health Check”
The AI-powered mastering assistant scans your music thoroughly, checking for:
- Frequency Imbalances: Is the bass muddy? Are vocals buried? It spots clashes.
- Dynamic Issues: Are drums too spikey? Does the chorus lack punch? It measures loudness variations.
- Genre Benchmarks: Comparing your track to thousands of pro songs in your style (e.g., “This indie rock mix needs tighter mids”).
Why it matters: Unlike basic tools that apply one-size-fits-all fixes, Remasterify’s AI adapts to your music’s unique needs.
2. The AI Makes Smart Adjustments
Using what it learns, the AI applies subtle tweaks:
- Spectral Balancing: Gently boosts dull highs or tames harsh frequencies—like a precision EQ.
- Dynamic Control: Evens out volume jumps so your song plays smoothly on any device.
- Stereo Enhancement: Widens narrow mixes or reels in overly separated instruments.
Mastering Tips #1: The AI preserves your artistic choices. If your lo-fi track is meant to sound dusty, it won’t “over-clean” it.
3. Precision Adjustments (No Blunt Force)
Using its analysis, the AI Mastering assistant applies fixes:
- Smart EQ: Boosts dull frequencies or tames harshness—without squashing your mix’s character.
- Dynamic Balance: Smooths out loud/soft sections so your song plays perfectly everywhere.
- Stereo Polishing: Adjusts width to feel full but natural (no artificial “over-widening”).
Mastering Tips #2: The AI respects your intent. If your track is intentionally raw (like garage rock), it won’t “over-clean” it.
Start With a Reference Track: Your Shortcut
Want your music to sound like your favorite artist’s track? That’s exactly what reference tracks help you achieve—and Remasterify makes it effortless. No technical skills needed. Here’s how it works:
Why References Matter
A reference track is like a blueprint for your master. Upload a song you love (e.g., a chart-topping hit in your genre), and Remasterify’s AI:
- Analyzes its sonic DNA (brightness, bass depth, vocal clarity).
- Compares it to your mix.
- Guides its adjustments to bridge the gap intelligently.
Mastering Tips #3: Pick a reference with similar instrumentation and production style. For example, don’t use a sparse acoustic track as a reference for EDM.
How Remasterify Simplifies the Process
- One-Click Upload: Drag and drop your reference file (MP3/WAV) next to your mix. No confusing settings.
- AI-Powered Matching: The smart mastering assistant doesn’t just copy the reference—it adapts its essence to your track. For example:
- If your reference has punchier drums, it subtly enhances your low-end impact.
- If the reference vocals sit forward, it gently lifts your midrange.
- Listen & Tweak (Optional): Use Remasterify’s intensity slider to control how closely the AI follows the reference:
- Lower: Keeps more of your original vibe.
- Higher: Gets closer to the reference’s polish.
Genre-Specific Examples
- Hip-Hop: Reference a bass-heavy track (like Kanye West) to get that crushing low end.
- Podcasts: Use a crisp interview (e.g., NPR) to prioritize vocal clarity.
- Rock: Match a loud-but-dynamic master (like Arctic Monkeys) to avoid over-compression.
Key Benefit: You get customized mastering without needing to understand EQ curves or LUFS targets.
Control the Mastering Intensity
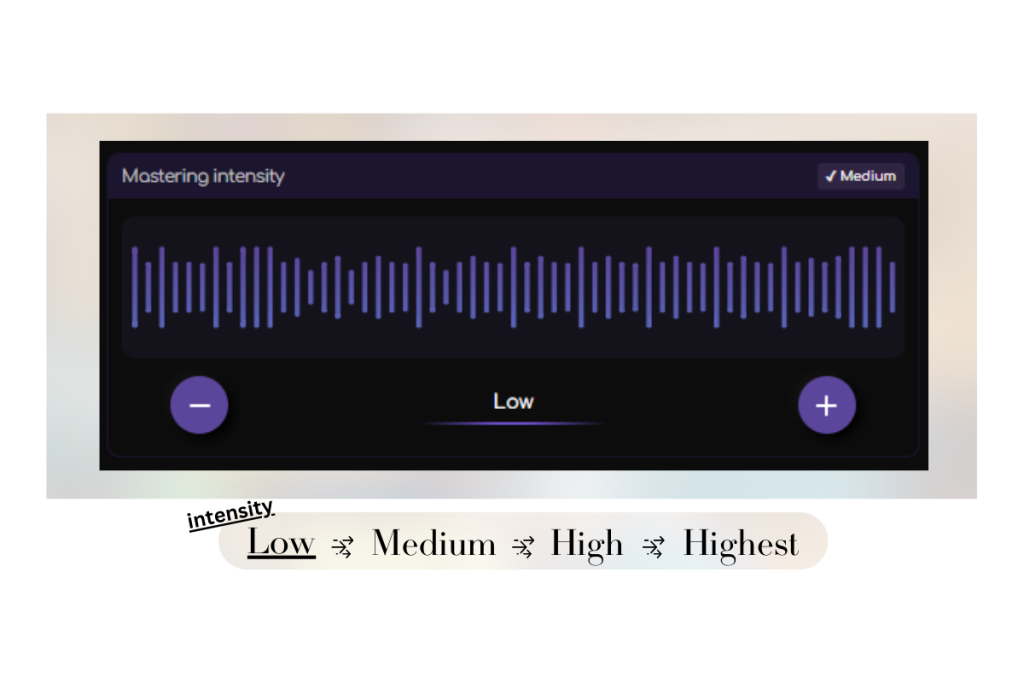
Think of Remasterify’s intensity slider as your AI’s “confidence dial.” It lets you decide how aggressively the mastering assistant tweaks your track. From gentle polish to full studio-grade punch. Here’s how to use it like a professional:
What the Intensity Levels Actually Do
- Lowest/Low:
- Best for: Raw recordings (live sessions, lo-fi), podcasts, jazz.
- What happens: Light EQ balancing + minimal loudness boosts. Keeps dynamics natural.
- Medium:
- Best for: Most genres (pop, rock, hip-hop).
- What happens: Clearer highs/tighter lows, balanced loudness for streaming.
- High/Highest:
- Best for: EDM, metal, or tracks needing “competitive” loudness.
- What happens: Maximizes impact (punchier drums, brighter vocals) while guarding against distortion.
Mastering Tips #4: Start at Low, then adjust after listening. Too intense? Dial it back to preserve emotion.
Why This Beats Presets
Other tools force you to pick a static preset (e.g., “Rock Master”). Remasterify’s slider lets you:
- Match your genre’s standards (e.g., EDM = High, acoustic = Low).
- Adapt to your mix’s needs: A dense track might need High, while a simple vocal/piano piece shines at Low.
- Fix past mistakes: Uncontrolled mix? Low/Medium intensity setting fixes the problem.
Read this blog to know about the best practices of vocal processing.
Real-World Example
- Before: A folk singer’s mix at Highest sounded squashed—like it was “pushing too hard.”
- After: Low intensity preserved the intimate, dynamic feel while still polishing harsh frequencies.
Key Takeaway: Intensity isn’t about “better” or “worse”—it’s about right for your sound.
Stereo Widening: From Intimate to Immersive in a click
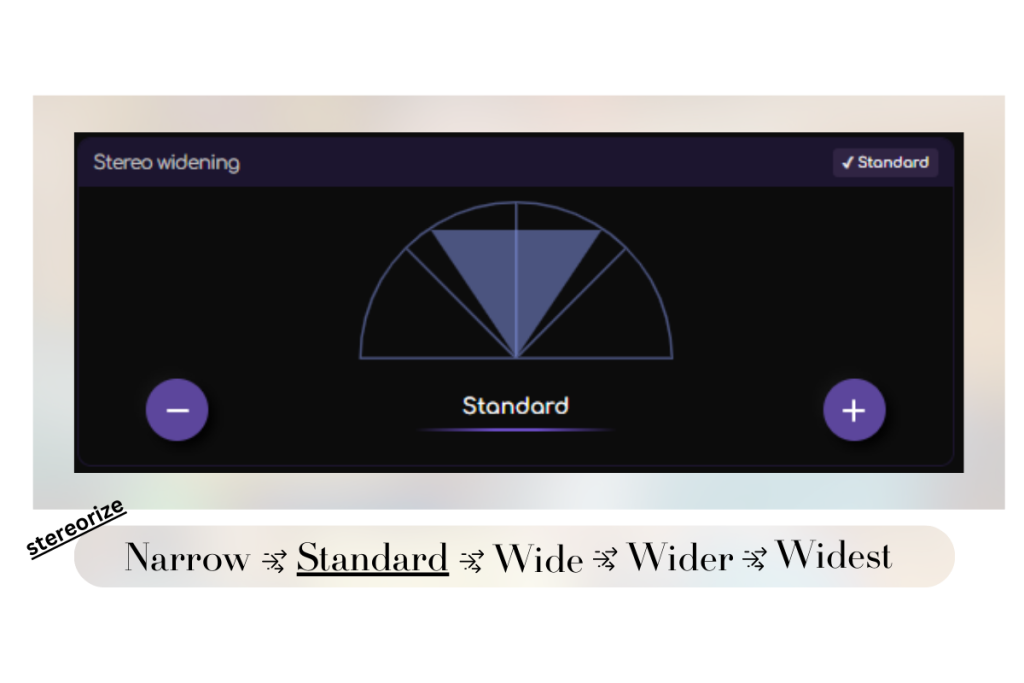
Your mix’s stereo image is like a stage—it decides how close or far instruments feel from the listener. Remasterify’s width settings let you design that space without confusing panning rules or phase issues. Here’s how to use them:
What Each Setting Actually Does
- Narrow:
- Best for: Podcasts, voiceovers, or vinyl/CD compatibility.
- What happens: Gently centers instruments for clarity (no “hollow” mono playback).
- Standard:
- Best for: Most genres (pop, rock, hip-hop).
- What happens: Natural width—like a well-mixed live band.
- Wide/Wider:
- Best for: Electronic, ambient, or cinematic tracks.
- What happens: Expands synths/pads for a “surround sound” effect (but keeps vocals centered).
- Widest:
- Best for: Experimental music, ASMR, or psychedelic effects.
- What happens: Extreme separation—use sparingly to avoid phase cancellation.
Mastering Tips #5: Always check your master in mono after widening. If vocals disappear, reduce the width.
Why This Matters
Bad stereo imaging can ruin a master:
- Too narrow: Feels flat and lifeless.
- Too wide: Sounds thin or collapses on phones.
Remasterify’s AI Mastering Assistant:
- Auto-detects your mix’s natural width.
- Adjusts safely: Avoids phase issues even at Wider settings.
Genre-Specific Examples
- Hip-Hop: Standard (tight bass + centered vocals) with Wide hats.
- Ambient: Wider for sprawling textures.
- Classical: Standard to preserve the room’s natural acoustics.
Key Benefit: You get a professional sound without manual panning or Haas tricks.
Clean Up with Noise Reduction
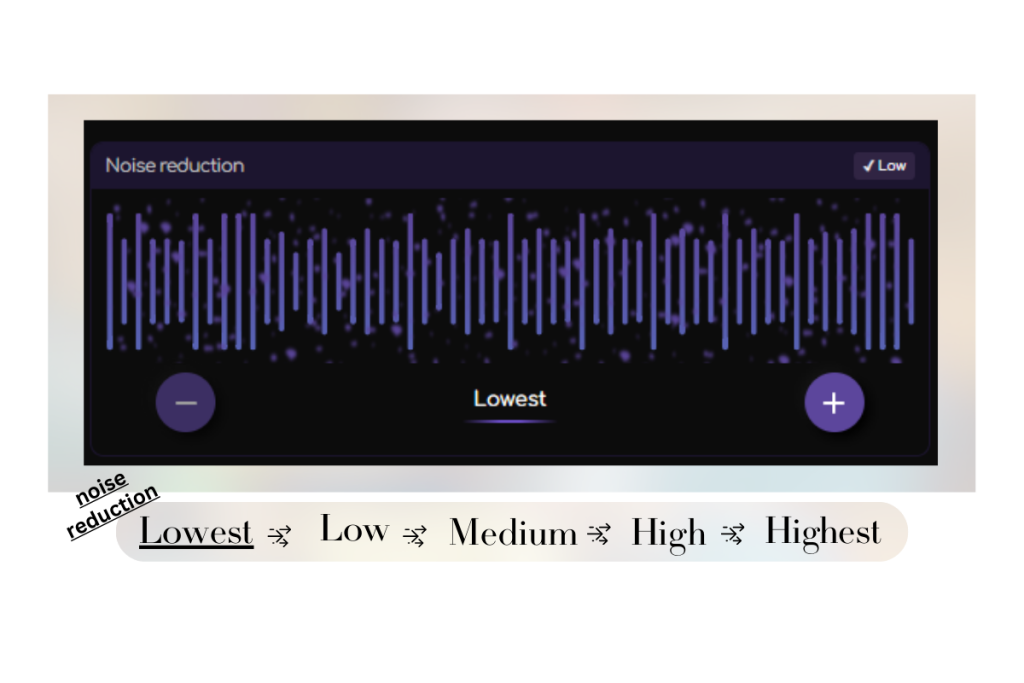
Even great mixes can have hidden noise—hiss, hum, or mic clicks. Remasterify’s noise reduction tackles these distractions without making your track sound artificial. Here’s how to use it wisely:
Smart Settings for Every Scenario
- Lowest/Low:
- Best for: Light tape hiss or room tone you want to preserve (e.g., vintage recordings).
- Medium:
- Best for: Common issues like USB hum or faint mouth clicks in podcasts.
- High/Highest:
- Best for: Harsh noise (e.g., amp buzz, HVAC rumble)—but use sparingly to avoid “over-sanitized” sound.
Mastering Tips #6: Always A/B test. If your track loses warmth at High, dial back to Medium.
Why Remasterify Does It Better
- AI-Powered Detection: Targets only problem frequencies, leaving vocals/instruments intact.
- No Artifacts: Unlike basic noise gates, it won’t chop off reverb tails or subtle breaths.
Tweak the AI equalizer: Smart controls VS Full custom control
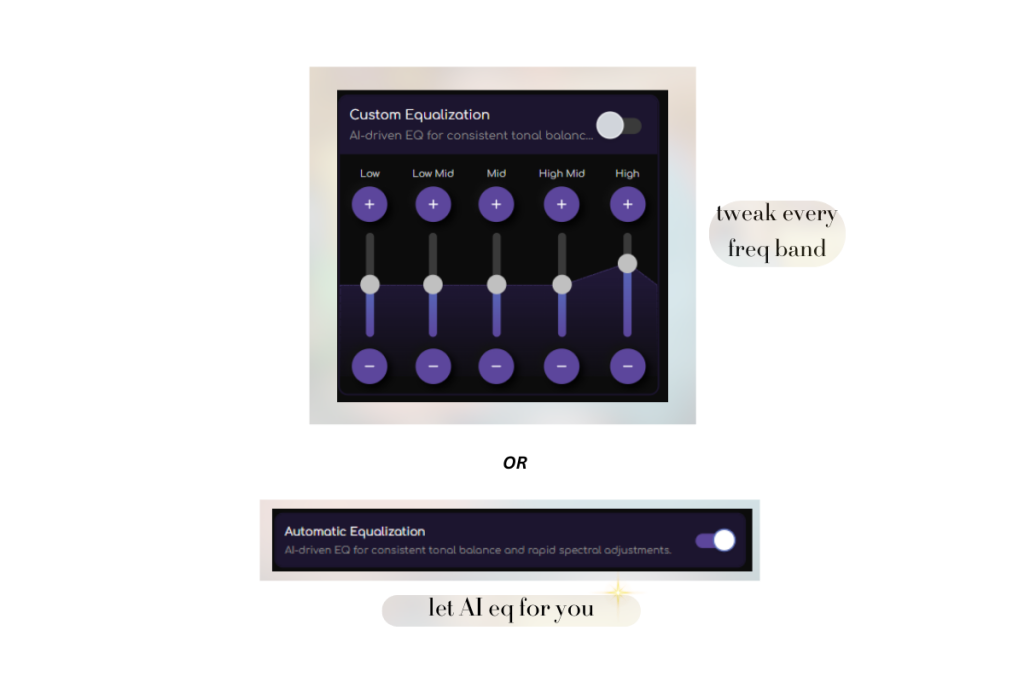
Remasterify’s AI Mastering Equalizer offers an automatic and custom solution as well. Here’s how to make it work for your sound:
1. Automatic Mode (Set-and-Forget)
- What It Does:
- Scans your track for frequency imbalances (e.g., boomy bass, harsh vocals).
- Applies subtle EQ boosts/cuts to match your genre’s standards.
- Best For:
- Quick masters when you’re short on time.
- Beginners who want professional sound without tweaking.
Mastering Tips #7: Listen first—the AI Mastering tool often catches problems you might miss!
2. Custom Mode (Your Turn to Drive)
Switch off “Automatic equalization” to:
- Boost/Cut Specific Frequencies:
- Need brighter vocals? Lift the 3–5 kHz range.
- Bass too thin? Gently boost 80–120Hz.
- Match Your Reference Track:
- A/B your EQ curve against your guide track for precision.
Why It’s Unique: Most AI mastering tools lock you into automatic settings. Remasterify respects your expertise.
Genre-Specific EQ Tricks
- Hip-Hop: Slight low-end bump (+2dB at 60Hz) for weight.
- Podcasts: Cut mud at 200–400Hz for clearer speech.
- Rock: Reduce 2–4kHz if guitars overpower vocals.
Key Benefit: Whether you trust the mastering assistant or take the wheel, your music stays true to your vision.
Why Remasterify is Your Ultimate Mastering Assistant
In a world of cookie-cutter AI Mastering tools, Remasterify is your true mastering assistant. Here’s what makes it irreplaceable:
1. Adapts to You, Not the Other Way Around
While other tools force you into rigid presets, Remasterify’s AI:
- Listens first: Analyzes your track’s unique characteristics before making adjustments.
- Follows your lead: Whether you rely on reference tracks or manual sliders, it enhances your vision, not some generic ideal.
2. Studio-Quality Control Without the Learning Curve
Forget deciphering spectral graphs or LUFS targets. Remasterify translates professional sound techniques into simple choices:
- Intelligent defaults: The AI handles technical heavy lifting (like phase-safe stereo widening).
- Strategic overrides: When you do tweak (e.g., EQ or intensity), it’s with purpose, not guesswork.
3. Built for Real-World Workflows
- Speed without sacrifice: Get radio-ready masters in minutes, but with the nuance of human-grade judgment.
- Genre-agnostic: Masters lo-fi hip-hop as symphonic scores, because it learns from your references.
- Mobility matters: Cloud-based means you can polish tracks anywhere—no expensive studio sessions.
Summary
Mastering shouldn’t be a compromise between speed and quality, or creativity and technicality. Remasterify bridges the gap, giving you an AI-powered ally that respects your artistry. Smart customization, intuitive controls, and genre-flexible intelligence transform raw mixes into polished gems.
Whether you’re a producer or a podcaster, Remasterify meets you where you are. No jargon, no presets, no guesswork. Just your music, elevated.
Ready to hear the difference? Try Remasterify today—your first master is free, and your sound deserves nothing less.