Drum and bass is one of the hardest genres in popular electronic music to mix cleanly. The reason is simple, and it’s the same reason the genre is so addictive when it works.
In a drum and bass track, the sub-bass, the bassline, the kick drum, and the fast breakbeats are all fighting for attention at the same time. The sub holds the bottom. The bass carries the melodic weight. The kick punches through. The breaks demand transient detail in the highs. No other electronic genre crowds the spectrum this hard.
Get any one of these elements wrong and the whole mix turns to mud. Get them right and the track has the focused, punchy heaviness that defines the genre.
This post is a step-by-step walkthrough of how to mix drum and bass without it sounding muddy. If you’re new to the genre, start with our Beginner’s Guide to Drum and Bass. If you’re already producing it, keep reading.
In this blog…
💡What is Drum and Bass mixing?
Mixing Drum and Bass is the high-speed art of blending or balancing tracks at a blistering 170–175 BPM while keeping the drums punchy and the low-end clean. For DJs, it requires precise phrasing and “bass swapping” to seamlessly transition or double-drop tracks without clashing. For music producers, it involves engineering tight sidechain compression and carving out specific frequencies so the massive sub-bass and intricate drum breaks don’t distort into a wall of noise.
Why Drum and Bass Mixes Sound Muddy in the First Place
Here’s the first thing most producers get wrong about muddy DnB mixes.
The mud isn’t in the sub.
When a DnB mix sounds muddy, the problem is almost always in the 150 to 500 Hz range — the low-mid region where the sub’s harmonics, the body of the bassline, the snare’s weight, the pads, and the mid of the Reese bass all collide. The sub-bass itself is rarely the issue. The issue is everything else stacking up on top of it.
This matters because most producers respond to a muddy mix by cutting the sub, which just makes the track sound thin without solving anything. The mud stays. The bottom disappears. Now the mix sounds both muddy and weak.
The fix is structural, not surgical. You don’t EQ your way out of mud in drum and bass. You make a series of decisions, in order, that prevent the mud from forming in the first place. We’ve covered the basic version of this in our broader guide to why mixes sound muddy and how to fix them, but drum and bass needs its own approach.
The next seven steps are that approach. 👇
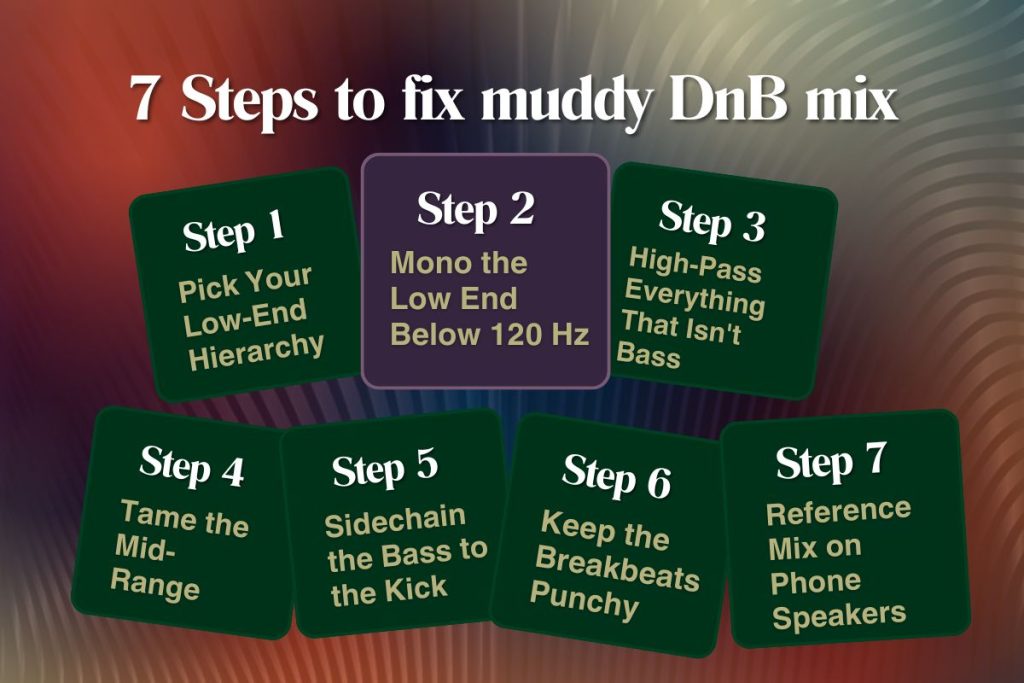
Step 1: Pick Your Low-End Hierarchy
The single most important decision in a drum and bass mix, and the one most producers skip, is this: who owns the sub.
You can have the kick drum holding down the very bottom of the spectrum, with the bassline sitting just above it. Or you can have the sub-bass owning the bottom, with the kick punching through the mid-low instead. You cannot have both. Two elements fighting for the same frequency range is the structural cause of most muddy DnB mixes.
The producers behind Mixed In Key’s low-end guide put it plainly. Bass frequencies weigh heavier in the mix. There’s less room down there to share. So pick one. Decide before you touch an EQ which element drives the sub and which one sits above.
In most modern DnB, the sub-bass owns the bottom and the kick punches through around 80 to 120 Hz. But there are exceptions. Jump-up tracks often flip it. Older jungle tracks let the breakbeats’ kick do the heavy lifting. There’s no universal right answer. There’s just a decision you have to make consciously, before everything else.
Step 2: Mono the Low End Below 120 Hz
This one is non-negotiable.
Anything below 120 Hz in your mix should be mono. Not stereo. Mono. The reason is physics. Low frequencies have long wavelengths, and when you spread them across a stereo field, they go out of phase with themselves on club PA systems and on phone speakers alike. The result is a low end that disappears the moment the track leaves your headphones.
Armada Music’s mixing guide makes the point clean — your kick and bass should be mono below 120 Hz if you want real low-end power. This is true for every electronic genre, but in drum and bass it’s the difference between a track that hits in a club and one that doesn’t.
Most DAWs let you check this in two ways. Use a stereo correlation meter to confirm your low end is centered, or temporarily collapse the master to mono and listen for what disappears. Anything that vanishes was relying on stereo phase trickery to exist, and it’ll vanish on a club system too.
Step 3: High-Pass Everything That Isn’t Bass
Every non-bass element in your mix is leaking low-end energy you don’t want.
Pads have low-frequency hum you can’t hear in your headphones but that eats your kick on a big system. Synths have sub-harmonics that fight your bassline. Hats and cymbals have low-mid noise that muddies the 200 Hz region. Even vocals, FX returns, and reverb tails contribute energy below 100 Hz that does nothing useful and steals space from the actual bass elements.
The fix is aggressive high-pass filtering on everything that isn’t supposed to be in the low end. EDMProd’s DnB production guide makes this point clearly — you can get away with more aggressive filtering in drum and bass than in most genres, because clean low-end space matters more here.
How high should you cut? Rule of thumb: start with a steep high-pass at 100 Hz on pads, synths, and FX returns. Cut hats and cymbals at 200 Hz or higher. Vocals can usually go at 80 to 100 Hz. The exact frequencies depend on the track, but the principle holds. If it isn’t a bass element, it doesn’t need anything below 100 Hz.
For the deeper logic of when and why high-pass filters work, see our guide on high-pass filters (when live).
Step 4: Tame the Mid-Range Where Everything Collides
This is where the actual mud lives.
Look at the 150 to 500 Hz region of any muddy DnB mix and you’ll find five or six elements stacking on top of each other. The harmonics of the sub-bass. The body of the bassline. The lower mids of the Reese. The fundamental of the snare. The warmth of the pads. The body of the kick. They all live here. They all need to share.
Most “muddy” complaints are mid-range complaints in disguise. Producers chase the sub thinking the problem is down there. The problem is up here.
The fix is surgical EQ. Find the dominant element in this range (usually the Reese or the bassline) and let it have the 200 to 400 Hz region as its territory. Cut every other element around it. Notch the snare’s low-mid muddy frequency around 300 Hz. Cut the pads around 250 Hz. Roll off the kick’s body just above 200 Hz. Each cut is small — 2 to 4 dB. But they add up.
The classic Reese bass is the most common offender here. It’s built from detuned saw waves that produce massive amounts of mid-range energy by design. If your Reese is the bass leader, treat the rest of the mix as supporting cast in the mids. If something else is leading, the Reese needs aggressive cuts in the 200-500 Hz region.
For the broader logic of where muddiness comes from, see our guide on why mixes sound muddy. The principles apply across genres. DnB just hits the problem harder.
Step 5: Sidechain the Bass to the Kick
Sidechain compression is where drum and bass finds its punch.
The technique is simple. When the kick hits, the compressor briefly ducks the bass, creating a small pocket of space for the kick’s transient to land. When the kick is gone, the bass comes back to full level. Done right, the listener doesn’t hear the ducking. They hear a kick that punches and a bass that breathes.
Done wrong, the whole mix pumps like a 2010s EDM track.
Settings matter. A fast attack (1 to 5 ms) catches the kick transient. A medium release (80 to 150 ms) lets the bass recover without sounding pumped. Ratio around 4:1 to 6:1 gives noticeable ducking without crushing. Threshold low enough that the kick triggers consistently, not so low that quieter hits pump too.
You don’t need a sidechain plugin to do this. Almost every modern DAW has a sidechain input on its stock compressor. Route the kick channel to the sidechain trigger of the compressor sitting on the bass. Done.
One advanced move that works well in DnB: sidechain only the lower frequencies of the bass, using a multiband compressor. The mids and highs of the bass stay constant, but the sub gets out of the kick’s way. The mix sounds tight without sounding pumped.
Step 6: Keep the Breakbeats Punchy
The other half of drum and bass is the drums.
Producers obsess over the low end and forget that drum and bass is also called drum and bass for a reason. The breakbeats need transient detail to cut through the dense low end below them. A snare with no snap, a kick with no click, hats with no air — and the whole mix sounds heavy and lifeless.
The temptation is to compress the drums hard for loudness. Don’t. Heavy compression flattens transients, which is exactly the opposite of what DnB needs. Use transient shapers instead, which let you boost the attack of each hit without crushing the dynamics. Then use parallel compression — a duplicate drum bus that’s heavily compressed, blended back under the original — to add weight without losing punch.
The Amen break and other classic breakbeats are full of natural transient detail. Your job is to preserve that detail, not bury it under low end. A snare that snaps at 5 kHz, a kick click at 3 kHz, hats with energy above 8 kHz — these are what give the drums their forward momentum.
For the broader principles of preserving transients and headroom, see our guide on headroom in audio. The same logic applies to drum mixing.
Step 7: Reference Your Mix on Phone Speakers
The final test is the cross-system check.
A DnB mix that sounds perfect in your studio headphones might have invisible sub-bass on a phone, a snare that disappears in a car, or a Reese that turns into a buzzsaw on cheap earbuds. Until you’ve heard the mix on at least three different systems, you don’t actually know what you have.
The cheapest test setup looks like this. Studio headphones for detail. Laptop speakers for mid-range translation. Phone speaker held at arm’s length for the worst-case scenario. If the mix still feels like the track you wrote on all three, you’re close.
Once your mix translates, the last step is mastering. Mastering is the final stage that takes the mix you’ve engineered and finishes it for streaming, club systems, and everywhere else the track will live. Drum and bass is one of the harder genres to master well because of the same reason it’s hard to mix — the sub-bass and the transients are pulling in opposite directions.
We’ll be covering this in detail in our upcoming post on how to master drum and bass for streaming. Until then, our guide on the five steps of mastering is the right starting point.
A clean drum and bass mix is the hardest part.
Once it’s done, Remasterify can take the final mix the rest of the way to a release-ready master in a few minutes.