
We can guess your situation right now. Not kidding, but really!
Most artists mastering rock at home have no framework. So, if you’re one of them, you might open a mastering chain, tweak parameters until it sounds better, and hope for the best.
But ultimately, the word “mastering” sounds to you like fog.
Half the internet says it’s the final magic. The other half says it’s just matching volume and avoiding clipping.
Neither is quite right.

This guide covers what mastering actually does for rock music, and why the loudness debate has more heat than light. And the honest truth most beginners never hear: your mix is doing 80 percent of the work before you ever touch a mastering plugin.
If you get the mix right, mastering is a light touch. If you don’t, no chain in the world will save it.
Summary
- Rock mastering starts with the mix. A good mix hits professional loudness easily. A mediocre one fights the limiter.
- Compressors and limiters don’t make things louder. Loudness is a byproduct of good decisions across the entire chain.
- Sub-genre changes the approach. Metal needs transient protection. Indie rock welcomes glue and saturation.
- Master to what the song needs, not to a number. Streaming normalizes loud masters down. Restraint often wins.
- Trust your ears. The framework replaces guesswork, but the final decision is always yours.
What Mastering Actually Does in Rock
Mastering is the final stage of a track’s production.
A fresh set of ears, or a fresh pass with fresh perspective, fixing what the mix missed. Adding cohesion, polish, and appropriate level. Making sure the track holds up across every playback system it will meet.
Here is the myth that ruins more rock mastering than any other.
Compressors and limiters do not make things louder. They make things quieter, then let you turn everything up around them.
Loudness is a byproduct of good decisions across the entire chain, not a fader you drag.
So, who says mastering is “just matching volume and avoiding clipping” was not wrong. The instinct is correct. It is just incomplete.
Mastering is also the point where tonal balance, stereo image, transient behavior, and dynamic character get finalized. Those decisions shape whether your track feels alive or flat when it plays back.
An Uncomfortable Truth: Loudness and Punch Are Mostly a Mix Problem
This is the section that separates producers who understand rock mastering from those who don’t.
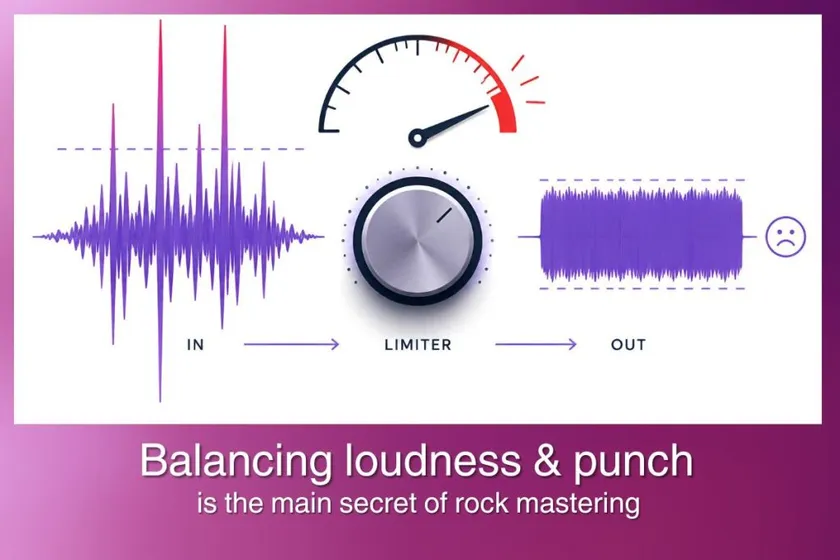
A good mix hits professional loudness easily. A mediocre one fights you the whole way. If you find yourself slamming a limiter at the mastering stage, doing 6 dB of gain reduction just to feel competitive, the problem isn’t the limiter. The problem is that the mix is too dynamic in the wrong ways.
Being too conservative in the mix is a real trap.
Everything peaking below -6 dB, minimal compression on individual channels, no bus compression. The mix sounds “clean” in the DAW, but the moment you try to master it, you’re asking the limiter to do the work that individual channel and bus compression should have done. The result is a flat, lifeless master.
The fix is upstream.
- Compress your drum, guitar, and vocal buses so peaks are already controlled before they reach the master.
- Use clip gain on the five or six rogue drum hits that spike above everything else.
Those individual peaks are usually the reason your headroom disappears. Tame them at the source and your limiter barely has to work.
If the mix is already close, an intelligent master can recover a lot. But recovery is not the same as fixing. A great mix uploaded to any mastering platform will always outperform a rushed mix run through the same tool.
Know Your Sub-Genre Before You Touch a Plugin
Rock is not one genre. The mastering approach for a metal track is not the same as for an indie rock track. The single most important variable is how much you protect the transients.
- Metal and hard rock (Bright, powerful low end – Scooped mids)
Transients matter enormously because the drums and guitars are already dense. Use longer compressor attack times to let the initial snap through, shorter release times, gentle ratios.
Hence, go easy on added saturation because the guitars are already distorted. Avoid brick-wall limiting.
Metallica’s Death Magnetic is the famous cautionary tale of what happens when you crush a rock master into oblivion chasing loudness.
- Indie rock (Darker, warmer, subdued top end. Embrace glue. Fast attack, slow release)
So, heavier compression is welcome. Tape saturation is your friend. Restraint often wins. Sometimes clip gain outperforms a compressor because it preserves the natural feel of the performance.
- Pop rock and classic rock (The middle path)
Moderate compression, moderate saturation, moderate limiting. Nothing extreme in any direction.
| Sub-genre | Compression style | Saturation | Limiter |
| Metal | Gentle, transient-preserving | Light | Careful |
| Indie rock | Heavier glue | Generous | Moderate |
| Pop / classic rock | Moderate | Moderate | Moderate |
A Rock Mastering Chain, with the Reasoning
Here is a starting template. Adapt it by ear.
[Caution: Do not treat it as a preset.]
1. Saturation or tape
First in the chain. Adds harmonic richness and gentle peak control. The rule most producers miss: more distortion means less saturation. Push it just enough to hear character. If it starts to sound obviously distorted, back off.
2. Compression
Glue and density. Slow attack, medium release, low ratio (2:1 to 4:1), targeting 1 to 3 dB of gain reduction at peaks. Parallel compression is powerful here because it adds power without flattening dynamics.
3. EQ
Surgical and minimal. If the mix is right, you barely need it. Use mid/side EQ to de-harsh brittle top end in the sides without dulling the center. A gentle high-shelf can add air. A gentle low-shelf can add weight. Do not sculpt aggressively at the mastering stage.
4. Clip or second saturator
Controlled clipping to shave peaks before the limiter. This is one of the highest-leverage moves in modern rock mastering. Shaving 1 to 2 dB of peaks with a clipper before the limiter frees the limiter to do less work.
5. Limiter
Last in the chain.
Modest ceiling (-1 dBTP). Aim for 1 to 3 dB of gain reduction on peaks, not 6 dB. If you’re doing 6 dB, go back to the mix.
Our guide on how to master your track in 5 steps covers the general principle across genres.
The Loudness Question, Finally Resolved
The internet is at war on this one. Some sources say never exceed -14 LUFS because streaming platforms turn you down. Others target -8 or -7 LUFS for rock. Both are half right.
Here is the mechanic everyone skips.
Streaming normalization turns loud masters down but never turns quiet ones up. A -8 LUFS master and a -14 LUFS master land at similar playback loudness on Spotify.
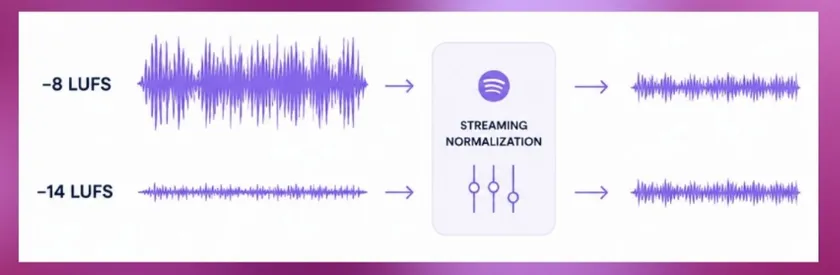
- The -8 version gave up dynamics for nothing on streaming.
- But the -8 version also loses on any playback system that doesn’t normalize (some hi-fi setups, vinyl, some DJ contexts, iTunes downloads).
Rock hides distortion behind guitars and grit. The genre tolerates and often wants more density than pop. Professional rock masters landing at -9 to -10 LUFS “without trying” are the honest middle. Not chasing loudness, not fearing it.
Master to what the song needs. Know your ballpark per destination. Streaming rewards restraint. Vinyl rewards restraint even more. Non-normalized playback rewards a considered level. The number is a consequence of the decisions, not the goal.
You Can’t Master What You Can’t Hear
- You cannot reliably master rock on headphones alone. Low end is unreliable on headphones. Transients feel exaggerated. Room reflections, phase, and mono compatibility all get missed.
- You do not need expensive monitors. You need honest ones, an untreated room where you know the flaws, and reference tracks you play at matched volume.
Check your master in mono to catch phase issues. Reference against professionally mastered tracks in the same sub-genre.
If you’re mastering on headphones only, use two or three sets and cross-check. Compare against a car speaker, a phone speaker, and your monitors if you have them.
Cross-system referencing is what saves rock masters from sounding great in one place and terrible everywhere else.
Mastering an Album, Not Just a Track
If you’re mastering a full album, three additional concerns apply.

- Level matching across tracks so the record feels cohesive.
- Tonal consistency so there’s no sudden EQ shift from song to song.
- Gapless flow between tracks where the arrangement calls for it.
Streaming and vinyl also want different masters.
Streaming platforms normalize and prefer a moderate LUFS target. Vinyl requires a specific master with reduced sub-bass energy, controlled sibilance, and often a slightly lower peak level to accommodate cutting head limitations. If you’re doing both, plan for two masters from the start.
DIY or Hire It Out?
DIY mastering is genuinely fine when the release is a demo, a small independent single, or a niche project where paying a mastering engineer isn’t justified. A light limiter and honest ears can carry a rock track farther than most producers realize.
A dedicated engineer earns their fee on album releases where cohesion matters, on vinyl prep where the technical requirements are strict, or when you’ve listened to your own mix so many times you can’t hear it clearly anymore. Fresh ears are the mastering engineer’s most valuable tool.
The middle path is AI-assisted mastering. Fast, affordable, consistent. Not a substitute for a top mastering engineer on a signature release, but genuinely competitive for singles and EPs. Remasterify is one option among several in that middle path. Upload a WAV, get a master back in minutes.
How to Prep Your Mix for Mastering
Four things every beginner should do before sending a mix to mastering.
- Leave headroom. Target peaks around -6 dBFS. No limiter on the master bus. Give the mastering process room to work.
- Fix phase and mono issues at the mix stage. If your mix falls apart in mono, mastering can’t fully save it.
- Export at 24-bit WAV, 44.1 or 48 kHz sample rate. Never send an MP3.
- Send reference tracks. Two or three professionally mastered songs in your sub-genre give the mastering engineer or tool a clear target.
Trust Your Ears
The framework above replaces “tweak until it sounds good” with a real workflow. Understand what mastering does. Fix the mix first. Know your sub-genre. Build a chain with reasoning. Master to what the song needs, not to a number. Monitor honestly. Prep properly.
But at the end of every session, your ears make the final call. If a decision that follows the framework sounds wrong, the framework is wrong for that track, not your ears.
Remasterify handles the mastering stage for producers who want a competitive result in minutes. Fast, honest, and never a substitute for a mix that’s already doing its job.